Bits & Bytes

Posts Tagged ‘computer programming’

Creating Timer Events in C#

If you want something to happen in a C# program at regular time intervals, the ideal way is to create a callback function that makes use of the Timer class. Below, I have created a class called CTimedObject that holds a Timer object. In the constructor, the Timer is allocated with a time interval of 2000 milliseconds or 2 seconds. Then OnTimedEvent() is set as a callback using the += operator and the Elapsed property. Finally, The Timer is started via a call to Start().

At this point, OnTimedEvent() will be called every 2 seconds. Inside the OnTimedEvent() function, the time is written to the console window via the passed in event object of type ElapsedEventArgs. The Object that is passed in is the Timer. Executing the program, the output looks like this

TimerEvent

Program.cs

using System;
using System.Timers;

namespace UsingTimers {
    class Program {
        static void Main(string[] args) {
            CTimedObject qTimedObject = new CTimedObject();
            Console.WriteLine("Press the Enter key to exit the program... ");
            Console.ReadLine();
        }
    }
}

CTimedObject.cs

using System;
using System.Timers;

namespace UsingTimers {
    class Program {
        static void Main(string[] args) {
            Timer qTimer = new Timer(2000);
            qTimer.Elapsed += OnTimedEvent;
            qTimer.Start();
            Console.WriteLine("Press the Enter key to exit the program... ");
            Console.ReadLine();
        }

        static private void OnTimedEvent(Object qTimer, ElapsedEventArgs eElapsed) {
            Console.WriteLine(eElapsed.SignalTime);
        }
    }
}

The code above demonstrates how to use a Timer in an object. Alternatively, we could do the same thing more simply if we just want the event to fire with a static function. Below, we have code that does exacly the same thing without using a separate class.

Program.cs

using System;
using System.Timers;

namespace UsingTimers {
    public class CTimedObject {

        Timer mqTimer = null;

        public CTimedObject() {
            mqTimer = new Timer(2000);
            mqTimer.Elapsed += OnTimedEvent;
            mqTimer.Start();
        }

        private void OnTimedEvent(Object qTimer, ElapsedEventArgs eElapsed) {
            Console.WriteLine(eElapsed.SignalTime);
        }
    }
}

Programming a 3D Scene in WPF with C#

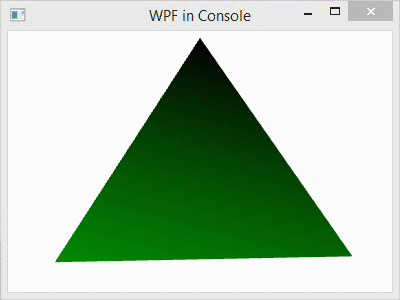
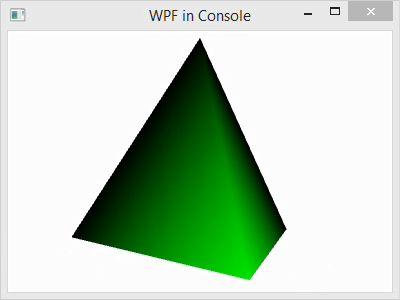
In this post, I explain the basic Windows Presentation Foundation programming elements of a 3D scene in C#. The C# code that I use for demonstration creates a simple tetrahedron model and rotates it around the vertical axis.

RotatingTetra

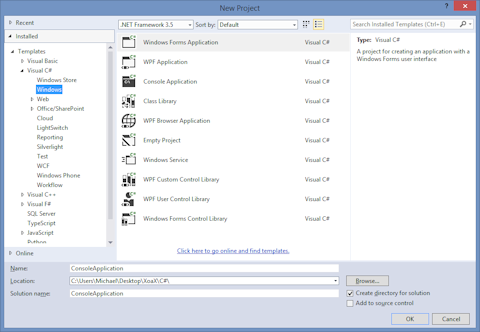
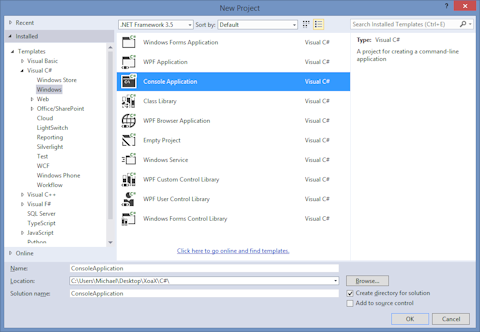
To create the project, follow these steps:

  1. Begin with the project from our prior blog post, or create a new WPF project.
    OpenProject
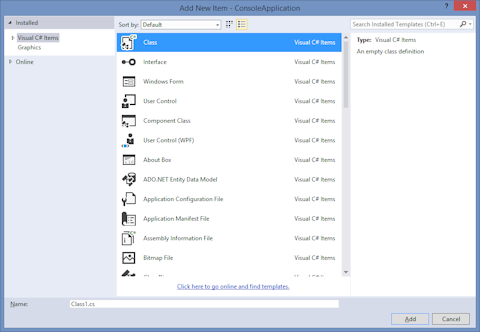
  2. Add a class file to the project: left-click PROJECT in the menubar and left-click Add Class… in the submenu.
    ProjectAddClass
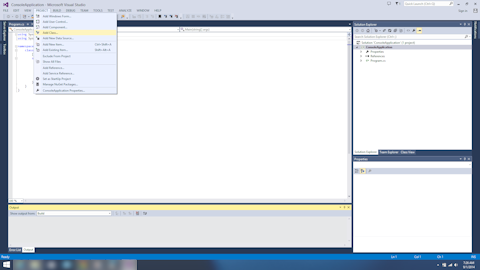
  3. This pops up the Add New Item dialog. Select Installed->Visual C# Items in the left-hand pane.
    VisualCsharpItems
  4. Then left-click Class in the center pane to select it.
    Class
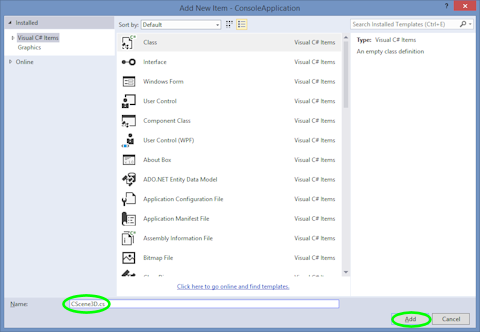
  5. Finally, rename the class by left-clicking the text box next to Name: at the bottom of the window and entering CScene3d.cs. Finish adding the class by left-clicking the Add button.RenameClass
  6. Next, copy the code for “CScene3D.cs” below into the file of the same name in your project.
  7. Finally, finish the code by adding this line to “Program.cs” as shown in the code below to allow the window to display the 3D scene:
    qWindow.Content = TestScenes.Test5();
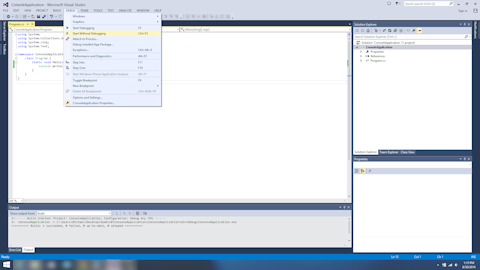
  8. Compile and execute the program by left-clicking DEBUG in the menubar and left-clicking Start Without Debugging in the submenu. After a few seconds, the code will be compiled and a window will pop up displaying a rotating tetrahedron.DemoImage

The WPF scene creation in “CScene3D.cs” consists of a few basic steps, which can be outlined as follows:


  1. Create a camera and add it.
  2. Create a lighting model and add it.
  3. Create a geometric model and add it
    1. Create points, triangles, and normals
    2. Set the material properties
    3. Create and apply transforms

For simplicity, I have skipped some steps, like adding normals, and accepted default values for much of the rest. At the end, I have collected components to added them appropriately. Pay close attention to that.

Program.cs

using System;
using System.Windows;

namespace ConsoleApplication {
    class Program {
        [STAThread]
        static void Main(string[] args) {
            Window qWindow = new Window();
            qWindow.Title = "WPF in Console";
            qWindow.Width = 400;
            qWindow.Height = 300;
            qWindow.Content = CScene3D.Test();
            qWindow.ShowDialog();
        }
    }
}

CScene3D.cs

using System;
using System.Windows;
using System.Windows.Controls;
using System.Windows.Media;
using System.Windows.Media.Media3D;
using System.Windows.Media.Animation;

namespace ConsoleApplication {
    class CScene3D {
        // Animation - Tetrahedron (upright, looking slightly up from below)
        public static Viewport3D Test() {

            // Define the camera
            PerspectiveCamera myPCamera = new PerspectiveCamera();
            myPCamera.Position = new Point3D(0, .2, 3);

            // Define a lighting model
            DirectionalLight myDirectionalLight = new DirectionalLight();

            // Define the geometry
            const double kdSqrt2 = 1.4142135623730950488016887242097;
            const double kdSqrt6 = 2.4494897427831780981972840747059;
            // Create a collection of vertex positions
            Point3DCollection myPositionCollection = new Point3DCollection();
            myPositionCollection.Add(new Point3D(0.0, 1.0, 0.0));
            myPositionCollection.Add(new Point3D(2.0 * kdSqrt2 / 3.0, -1.0 / 3.0, 0.0));
            myPositionCollection.Add(new Point3D(-kdSqrt2 / 3.0, -1.0 / 3.0, kdSqrt6 / 3.0));
            myPositionCollection.Add(new Point3D(-kdSqrt2 / 3.0, -1.0 / 3.0, -kdSqrt6 / 3.0));
            // Create a collection of triangle indices
            Int32Collection myTriangleIndicesCollection = new Int32Collection();
            // Triangle
            myTriangleIndicesCollection.Add(0);
            myTriangleIndicesCollection.Add(2);
            myTriangleIndicesCollection.Add(1);
            // Triangle
            myTriangleIndicesCollection.Add(0);
            myTriangleIndicesCollection.Add(1);
            myTriangleIndicesCollection.Add(3);
            // Triangle
            myTriangleIndicesCollection.Add(0);
            myTriangleIndicesCollection.Add(3);
            myTriangleIndicesCollection.Add(2);
            // Triangle
            myTriangleIndicesCollection.Add(1);
            myTriangleIndicesCollection.Add(2);
            myTriangleIndicesCollection.Add(3);
            MeshGeometry3D myMeshGeometry3D = new MeshGeometry3D();
            myMeshGeometry3D.Positions = myPositionCollection;
            myMeshGeometry3D.TriangleIndices = myTriangleIndicesCollection;
            // Apply the mesh to the geometry model.
            GeometryModel3D myGeometryModel = new GeometryModel3D();
            myGeometryModel.Geometry = myMeshGeometry3D;

            // Define the material for the geometry
            SolidColorBrush qColorBrush = new SolidColorBrush(Color.FromArgb(255, 0, 255, 0));
            DiffuseMaterial myMaterial = new DiffuseMaterial(qColorBrush);
            myGeometryModel.Material = myMaterial;

            // Define the transformation, if any. In this case, we use an animated transformation
            RotateTransform3D myRotateTransform = 
                new RotateTransform3D(new AxisAngleRotation3D(new Vector3D(0, 1, 0), 1));
            DoubleAnimation myAnimation = new DoubleAnimation();
            myAnimation.From = 1;
            myAnimation.To = 361;
            myAnimation.Duration = new Duration(TimeSpan.FromMilliseconds(5000));
            myAnimation.RepeatBehavior = RepeatBehavior.Forever;
            myRotateTransform.Rotation.BeginAnimation(AxisAngleRotation3D.AngleProperty, myAnimation);
            myGeometryModel.Transform = myRotateTransform;

            // Collect the components
            Model3DGroup myModel3DGroup = new Model3DGroup();
            myModel3DGroup.Children.Add(myDirectionalLight);
            myModel3DGroup.Children.Add(myGeometryModel);
            ModelVisual3D myModelVisual3D = new ModelVisual3D();
            myModelVisual3D.Content = myModel3DGroup;
            Viewport3D myViewport3D = new Viewport3D();
            myViewport3D.Children.Add(myModelVisual3D);
            myViewport3D.Camera = myPCamera;

            return myViewport3D;
        }
    }
}

Creating a C# Console Application in Visual Studio 2013

This post explains how to create a simple console application in C# and make it print out a message. Console applications are the simplest applications. So, this is the perfect place to start if you have no prior knowledge of C#.

  1. Navigate to the Start menu by left-clicking the Windows icon in the lower-left corner of your Desktop screen.
    Desktop
  2. Then left-click the down arrow in the lower-left corner to go the Apps section and find the Visual Studio 2013 icon.
  3. Left-click the Visual Studio 2013 icon to open the Visual Studio 2013 application.
    StartMenu
  4. Left-click FILE in the menubar, mouse over New in the submenu, and left-click Project in the submenu to open the New Project dialog.
    NewProject
  5. Select Installed->Templates->Visual C#->Windows in the left-hand pane.
    Installed_Templates
  6. Then left-click Console Application in the center pane.
    ConsoleAppplication
  7. If you want to accept the default project name and location, left-click the OK button to finish creating the console application. Otherwise, you can first:
    1. Set the name of the project in the field next to “Name:” near the bottom of the dialog.
    2. Select a location by left-clicking the “Browse” button.
  8. Now the project is created. To get the program to do something, add the line
    Console.WriteLine("God is Love!");

    to the code file “Program.cs” so that the final code looks like this:

    using System;
    using System.Collections.Generic;
    using System.Linq;
    using System.Text;
    
    namespace ConsoleApplication {
        class Program {
            static void Main(string[] args) {
                Console.WriteLine("God is Love!");
            }
        }
    }
    
  9. To compile and run the program, left-click DEBUG in the menubar and left-click Start Without Debugging in the submenu.
    StartWithoutDebugging
  10. When the program finishes compiling and runs, a console window should open like this one with the message “God is Love!” inside of it.
    Output
 

© 2007–2024 XoaX.net LLC. All rights reserved.