Bits & Bytes

Posts Tagged ‘tetrahedron’

Automatic 3D Normal Vector Calculation in C# WPF Applications

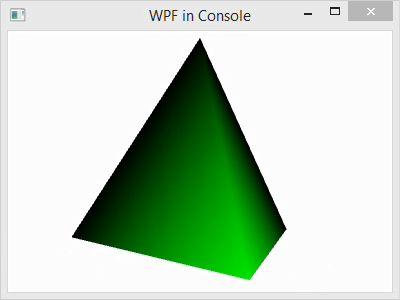
The normal vectors that are used to calculate the light reflections for 3D graphics in Window Presentation Foundation are based on how the mesh geometry is specified. Of course, the normals (normal vectors) can be set manually, but when they are calculated automatically for vertices, the normals are formed by averaging the normals of the adjacent triangles as specified by the geometry graph. To illustrate, I have a tetrahedron with two different graph specifications, but the same vertices.

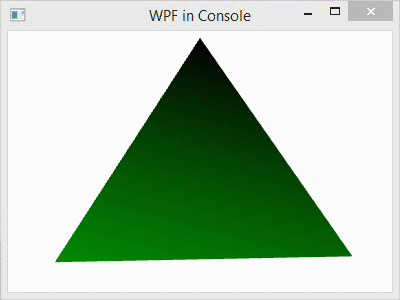
The C# project for this blog post is the same as it was in my prior blog post, and the code is similar as well. In that post, I used normals that were calculated as the average of the three adjacent triangle faces, and the color was smoothly interpolated across each face. In this post, I have changed the camera angle slightly, but I have used the same normal calculation in the code below. However, I have also include code for flat shading as well as the code for smooth shading for comparison. You can copy and paste the flat shading code over the smooth shading to try it out. A side-by-side comparison of the two is shown in the image below: left is smooth and right is flat.

Comparison

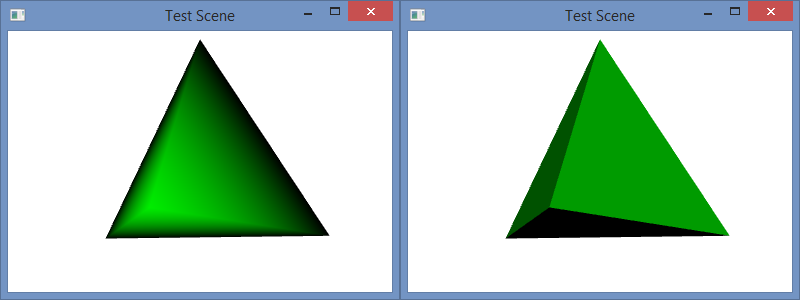
The code snippets below are comprised of the code for the two geometry specifications and our two code files: Program.cs and CScene3D.cs. Each geometry specifications can be pasted into the file CScene3D.cs over the other to replace it to set the shading accordingly. In the flat shading model, each vertex is specified three times: once for each of the triangle faces that contains it. In the smooth mode, each vertex is shared by three triangle faces; note the vertex indices for each triangle.

This explains how the normal calculations are made for each vertex. They are averaged over all of the triangles that contain the vertex. Since each vertex in the flat model is contained in exactly one triangle, the shading is specified by that single face–like the rest of the vertices in that triangle. That is why the shading is constant over each face.

To understand why either these models might be used, consider the purpose of the rendering. For a facetted surface, like a diamond, we would want to use the flat shading model to correctly illustrate the facets. For a smooth surface, like the Earth, we would want to use a smooth model to hide the polygons and make the surface appear smoother. In this program, we would probably want to used flat shading because the model is a tetrahedron. A tetrahedron is facetted, and it’s corners are so sharp that they can never appear smooth. So, smooth shading always looks strange for it.

Flat Model

            // Create a collection of vertex positions
            Point3DCollection qPoints = new Point3DCollection();
            // Triangle 1
            qPoints.Add(new Point3D(0.0, 1.0, 0.0));
            qPoints.Add(new Point3D(-kdSqrt2 / 3.0, -1.0 / 3.0, kdSqrt6 / 3.0));
            qPoints.Add(new Point3D(2.0 * kdSqrt2 / 3.0, -1.0 / 3.0, 0.0));
            // Triangle 2
            qPoints.Add(new Point3D(0.0, 1.0, 0.0));
            qPoints.Add(new Point3D(2.0 * kdSqrt2 / 3.0, -1.0 / 3.0, 0.0));
            qPoints.Add(new Point3D(-kdSqrt2 / 3.0, -1.0 / 3.0, -kdSqrt6 / 3.0));
            // Triangle 3
            qPoints.Add(new Point3D(0.0, 1.0, 0.0));
            qPoints.Add(new Point3D(-kdSqrt2 / 3.0, -1.0 / 3.0, -kdSqrt6 / 3.0));
            qPoints.Add(new Point3D(-kdSqrt2 / 3.0, -1.0 / 3.0, kdSqrt6 / 3.0));
            // Triangle 4
            qPoints.Add(new Point3D(2.0 * kdSqrt2 / 3.0, -1.0 / 3.0, 0.0));
            qPoints.Add(new Point3D(-kdSqrt2 / 3.0, -1.0 / 3.0, kdSqrt6 / 3.0));
            qPoints.Add(new Point3D(-kdSqrt2 / 3.0, -1.0 / 3.0, -kdSqrt6 / 3.0));
            // Designate Triangles
            Int32Collection qTriangles = new Int32Collection();
            // Triangle 1
            qTriangles.Add(0);
            qTriangles.Add(1);
            qTriangles.Add(2);
            // Triangle 2
            qTriangles.Add(3);
            qTriangles.Add(4);
            qTriangles.Add(5);
            // Triangle 3
            qTriangles.Add(6);
            qTriangles.Add(7);
            qTriangles.Add(8);
            // Triangle 4
            qTriangles.Add(9);
            qTriangles.Add(10);
            qTriangles.Add(11);

Smooth Model

            // Create a collection of vertex positions
            Point3DCollection qPoints = new Point3DCollection();
            qPoints.Add(new Point3D(0.0, 1.0, 0.0));
            qPoints.Add(new Point3D(2.0 * kdSqrt2 / 3.0, -1.0 / 3.0, 0.0));
            qPoints.Add(new Point3D(-kdSqrt2 / 3.0, -1.0 / 3.0, kdSqrt6 / 3.0));
            qPoints.Add(new Point3D(-kdSqrt2 / 3.0, -1.0 / 3.0, -kdSqrt6 / 3.0));
            // Designate Triangles
            Int32Collection qTriangles = new Int32Collection();
            // Triangle 1
            qTriangles.Add(0);
            qTriangles.Add(2);
            qTriangles.Add(1);
            // Triangle 2
            qTriangles.Add(0);
            qTriangles.Add(1);
            qTriangles.Add(3);
            // Triangle 3
            qTriangles.Add(0);
            qTriangles.Add(3);
            qTriangles.Add(2);
            // Triangle 4
            qTriangles.Add(1);
            qTriangles.Add(2);
            qTriangles.Add(3);

Program.cs

using System;
using System.Windows;

namespace ConsoleApplication {
    class Program {
        [STAThread]
        static void Main(string[] args) {
            Window qWindow = new Window();
            qWindow.Title = "WPF in Console";
            qWindow.Width = 400;
            qWindow.Height = 300;
            qWindow.Content = CScene3D.Test();
            qWindow.ShowDialog();
        }
    }
}

CScene3D.cs

using System;
using System.Windows;
using System.Windows.Controls;
using System.Windows.Media;
using System.Windows.Media.Media3D;
using System.Windows.Media.Animation;

namespace ConsoleApplication {
    class CScene3D {
        // Animation - Tetrahedron (upright, looking slightly up from below)
        public static Viewport3D Test() {
            // Define the camera
            PerspectiveCamera qCamera = new PerspectiveCamera();
            qCamera.Position = new Point3D(0, -.5, 2);
            qCamera.LookDirection = new Vector3D(0, .3, -1);
            qCamera.UpDirection = new Vector3D(0, 1, 0);
            qCamera.FieldOfView = 60;

            // Define a lighting model
            DirectionalLight qLight = new DirectionalLight();

            // Define the geometry
            const double kdSqrt2 = 1.4142135623730950488016887242097;
            const double kdSqrt6 = 2.4494897427831780981972840747059;
            // Create a collection of vertex positions
            Point3DCollection qPoints = new Point3DCollection();
            qPoints.Add(new Point3D(0.0, 1.0, 0.0));
            qPoints.Add(new Point3D(2.0 * kdSqrt2 / 3.0, -1.0 / 3.0, 0.0));
            qPoints.Add(new Point3D(-kdSqrt2 / 3.0, -1.0 / 3.0, kdSqrt6 / 3.0));
            qPoints.Add(new Point3D(-kdSqrt2 / 3.0, -1.0 / 3.0, -kdSqrt6 / 3.0));
            // Designate Triangles
            Int32Collection qTriangles = new Int32Collection();
            // Triangle 1
            qTriangles.Add(0);
            qTriangles.Add(2);
            qTriangles.Add(1);
            // Triangle 2
            qTriangles.Add(0);
            qTriangles.Add(1);
            qTriangles.Add(3);
            // Triangle 3
            qTriangles.Add(0);
            qTriangles.Add(3);
            qTriangles.Add(2);
            // Triangle 4
            qTriangles.Add(1);
            qTriangles.Add(2);
            qTriangles.Add(3);

            MeshGeometry3D qMesh = new MeshGeometry3D();
            qMesh.Positions = qPoints;
            qMesh.TriangleIndices = qTriangles;
            // Apply the mesh to the geometry model.
            GeometryModel3D myGeometryModel = new GeometryModel3D();
            myGeometryModel.Geometry = qMesh;

            // Define the material for the geometry
            SolidColorBrush qBrush = new SolidColorBrush(Color.FromArgb(255, 0, 255, 0));
            DiffuseMaterial qMaterial = new DiffuseMaterial(qBrush);
            myGeometryModel.Material = qMaterial;

            // Define the transformation, if any. In this case, we use an animated transformation
            RotateTransform3D qRotation =
                new RotateTransform3D(new AxisAngleRotation3D(new Vector3D(0, 1, 0), 1));
            DoubleAnimation qAnimation = new DoubleAnimation();
            qAnimation.From = 1;
            qAnimation.To = 361;
            qAnimation.Duration = new Duration(TimeSpan.FromMilliseconds(5000));
            qAnimation.RepeatBehavior = RepeatBehavior.Forever;
            qRotation.Rotation.BeginAnimation(AxisAngleRotation3D.AngleProperty, qAnimation);
            myGeometryModel.Transform = qRotation;

            // Collect the components
            Model3DGroup qModelGroup = new Model3DGroup();
            qModelGroup.Children.Add(qLight);
            qModelGroup.Children.Add(myGeometryModel);
            ModelVisual3D qVisual = new ModelVisual3D();
            qVisual.Content = qModelGroup;
            Viewport3D qViewport = new Viewport3D();
            qViewport.Children.Add(qVisual);
            qViewport.Camera = qCamera;

            return qViewport;
        }
    }
}

Programming a 3D Scene in WPF with C#

In this post, I explain the basic Windows Presentation Foundation programming elements of a 3D scene in C#. The C# code that I use for demonstration creates a simple tetrahedron model and rotates it around the vertical axis.

RotatingTetra

To create the project, follow these steps:

  1. Begin with the project from our prior blog post, or create a new WPF project.
    OpenProject
  2. Add a class file to the project: left-click PROJECT in the menubar and left-click Add Class… in the submenu.
    ProjectAddClass
  3. This pops up the Add New Item dialog. Select Installed->Visual C# Items in the left-hand pane.
    VisualCsharpItems
  4. Then left-click Class in the center pane to select it.
    Class
  5. Finally, rename the class by left-clicking the text box next to Name: at the bottom of the window and entering CScene3d.cs. Finish adding the class by left-clicking the Add button.RenameClass
  6. Next, copy the code for “CScene3D.cs” below into the file of the same name in your project.
  7. Finally, finish the code by adding this line to “Program.cs” as shown in the code below to allow the window to display the 3D scene:
    qWindow.Content = TestScenes.Test5();
  8. Compile and execute the program by left-clicking DEBUG in the menubar and left-clicking Start Without Debugging in the submenu. After a few seconds, the code will be compiled and a window will pop up displaying a rotating tetrahedron.DemoImage

The WPF scene creation in “CScene3D.cs” consists of a few basic steps, which can be outlined as follows:


  1. Create a camera and add it.
  2. Create a lighting model and add it.
  3. Create a geometric model and add it
    1. Create points, triangles, and normals
    2. Set the material properties
    3. Create and apply transforms

For simplicity, I have skipped some steps, like adding normals, and accepted default values for much of the rest. At the end, I have collected components to added them appropriately. Pay close attention to that.

Program.cs

using System;
using System.Windows;

namespace ConsoleApplication {
    class Program {
        [STAThread]
        static void Main(string[] args) {
            Window qWindow = new Window();
            qWindow.Title = "WPF in Console";
            qWindow.Width = 400;
            qWindow.Height = 300;
            qWindow.Content = CScene3D.Test();
            qWindow.ShowDialog();
        }
    }
}

CScene3D.cs

using System;
using System.Windows;
using System.Windows.Controls;
using System.Windows.Media;
using System.Windows.Media.Media3D;
using System.Windows.Media.Animation;

namespace ConsoleApplication {
    class CScene3D {
        // Animation - Tetrahedron (upright, looking slightly up from below)
        public static Viewport3D Test() {

            // Define the camera
            PerspectiveCamera myPCamera = new PerspectiveCamera();
            myPCamera.Position = new Point3D(0, .2, 3);

            // Define a lighting model
            DirectionalLight myDirectionalLight = new DirectionalLight();

            // Define the geometry
            const double kdSqrt2 = 1.4142135623730950488016887242097;
            const double kdSqrt6 = 2.4494897427831780981972840747059;
            // Create a collection of vertex positions
            Point3DCollection myPositionCollection = new Point3DCollection();
            myPositionCollection.Add(new Point3D(0.0, 1.0, 0.0));
            myPositionCollection.Add(new Point3D(2.0 * kdSqrt2 / 3.0, -1.0 / 3.0, 0.0));
            myPositionCollection.Add(new Point3D(-kdSqrt2 / 3.0, -1.0 / 3.0, kdSqrt6 / 3.0));
            myPositionCollection.Add(new Point3D(-kdSqrt2 / 3.0, -1.0 / 3.0, -kdSqrt6 / 3.0));
            // Create a collection of triangle indices
            Int32Collection myTriangleIndicesCollection = new Int32Collection();
            // Triangle
            myTriangleIndicesCollection.Add(0);
            myTriangleIndicesCollection.Add(2);
            myTriangleIndicesCollection.Add(1);
            // Triangle
            myTriangleIndicesCollection.Add(0);
            myTriangleIndicesCollection.Add(1);
            myTriangleIndicesCollection.Add(3);
            // Triangle
            myTriangleIndicesCollection.Add(0);
            myTriangleIndicesCollection.Add(3);
            myTriangleIndicesCollection.Add(2);
            // Triangle
            myTriangleIndicesCollection.Add(1);
            myTriangleIndicesCollection.Add(2);
            myTriangleIndicesCollection.Add(3);
            MeshGeometry3D myMeshGeometry3D = new MeshGeometry3D();
            myMeshGeometry3D.Positions = myPositionCollection;
            myMeshGeometry3D.TriangleIndices = myTriangleIndicesCollection;
            // Apply the mesh to the geometry model.
            GeometryModel3D myGeometryModel = new GeometryModel3D();
            myGeometryModel.Geometry = myMeshGeometry3D;

            // Define the material for the geometry
            SolidColorBrush qColorBrush = new SolidColorBrush(Color.FromArgb(255, 0, 255, 0));
            DiffuseMaterial myMaterial = new DiffuseMaterial(qColorBrush);
            myGeometryModel.Material = myMaterial;

            // Define the transformation, if any. In this case, we use an animated transformation
            RotateTransform3D myRotateTransform = 
                new RotateTransform3D(new AxisAngleRotation3D(new Vector3D(0, 1, 0), 1));
            DoubleAnimation myAnimation = new DoubleAnimation();
            myAnimation.From = 1;
            myAnimation.To = 361;
            myAnimation.Duration = new Duration(TimeSpan.FromMilliseconds(5000));
            myAnimation.RepeatBehavior = RepeatBehavior.Forever;
            myRotateTransform.Rotation.BeginAnimation(AxisAngleRotation3D.AngleProperty, myAnimation);
            myGeometryModel.Transform = myRotateTransform;

            // Collect the components
            Model3DGroup myModel3DGroup = new Model3DGroup();
            myModel3DGroup.Children.Add(myDirectionalLight);
            myModel3DGroup.Children.Add(myGeometryModel);
            ModelVisual3D myModelVisual3D = new ModelVisual3D();
            myModelVisual3D.Content = myModel3DGroup;
            Viewport3D myViewport3D = new Viewport3D();
            myViewport3D.Children.Add(myModelVisual3D);
            myViewport3D.Camera = myPCamera;

            return myViewport3D;
        }
    }
}
 

© 2007–2024 XoaX.net LLC. All rights reserved.