The Demonstration
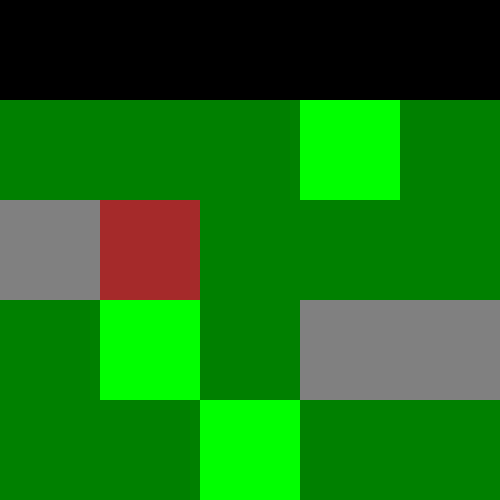
The basis for many 2D games is a tiled game board that you can navigate by pressing direction keys to walk across it one square at a time. In this post, I will show you how to program the basic elements of this type of game engine. If you want to see the code run, left-click this link and use the arrow keys to walk around the board.
The screen displays a 5×5 board of squares. These squares represent the visible portion of the map. The squares are painted in different shades and colors to represent what would be different types of terrain on the map. The map is a 20×20 block of randomly-generated colors that represent the different terrains. The 5×5 board is centered on a square of the map that represents the character’s position. Squares that lie outside the map are colored black to show that we can not move onto them.
The Code
The code consists of two code files which are shown below: an HTML file and a JavaScript file. The HTML code can be copied into any file with a .html extension while the JavaScript file should be named “XoaXGameBoard2D.js” in order to work with the HTML file as it is written here. The HTML file consists of 25 divs that are 100 pixels by 100 pixels and are contained inside of one large div that is 500 pixels by 500 pixels; this is the game board and the small divs are colored to represent the terrain. The JavaScript file consists of four functions that are used to initialize and update the game board and handle key presses.
The Initialize() function is set to be called when the window is loaded. Once the window is loaded, the first set of for-loops allocates a 20×20 2d array for the qppMap array and fills it with colors via calls to the GetRandomColor() function. After the map is created, the board of visible tiles is allocated as the 2d array qppBoard and the entries are set equal to the 25 small div elements. These elements are colored via the call to the ColorBoard() function. Then we set the function KeyHandler() to be called to handle key down events. and set the variable qpBkdg to hold the large div that holds the whole map.
The function GetRandomColor() returns a color when it is called. The four colors represent different terrains with the green being generated more frequently as the base color–think of it as something like plain grass.
The ColorBoard() function is used to color the board squares initially and after every move that is made. Each color is pulled from the corresponding squares of the map and black is used to represent squares that are off the map. Note that the integers iLocX and iLocY are used to represent the position of the character, which is always located in the center board tile.
To move our character around the map, we use the function KeyHandler() to process key events when an arrow key is pushed. The function uses the four key codes to handle each of the four directional key pushes. To do this, it checks that the move does not take the character off of the map and then adjusts the coordinates of the character’s position: iLocX and iLocY. Once this is done, the board is repainted via the call to ColorBoard().
HTML File
<!DOCTYPE html PUBLIC "-//W3C//DTD XHTML 1.0 Transitional//EN"

"http://www.w3.org/TR/xhtml1/DTD/xhtml1-transitional.dtd">
<html xmlns="http://www.w3.org/1999/xhtml" xml:lang="en" lang="en">
<head>
<title>XoaX.net's Javascript 2D Game Board Example</title>
<script type="text/javascript" src="XoaXGameBoard2D.js"></script>
</head>
<body>
<div id="gameboard" style="position:absolute; width:500px; height:500px; background:#aaaaaa; margin:30px;">
<div id="A11" style="left:0px; top:0px; position:absolute; width:100px; height:100px;"></div>
<div id="A12" style="left:100px; top:0px; position:absolute; width:100px; height:100px;"></div>
<div id="A13" style="left:200px; top:0px; position:absolute; width:100px; height:100px;"></div>
<div id="A14" style="left:300px; top:0px; position:absolute; width:100px; height:100px;"></div>
<div id="A15" style="left:400px; top:0px; position:absolute; width:100px; height:100px;"></div>
<div id="A21" style="left:0px; top:100px; position:absolute; width:100px; height:100px;"></div>
<div id="A22" style="left:100px; top:100px; position:absolute; width:100px; height:100px;"></div>
<div id="A23" style="left:200px; top:100px; position:absolute; width:100px; height:100px;"></div>
<div id="A24" style="left:300px; top:100px; position:absolute; width:100px; height:100px;"></div>
<div id="A25" style="left:400px; top:100px; position:absolute; width:100px; height:100px;"></div>
<div id="A31" style="left:0px; top:200px; position:absolute; width:100px; height:100px;"></div>
<div id="A32" style="left:100px; top:200px; position:absolute; width:100px; height:100px;"></div>
<div id="A33" style="left:200px; top:200px; position:absolute; width:100px; height:100px;"></div>
<div id="A34" style="left:300px; top:200px; position:absolute; width:100px; height:100px;"></div>
<div id="A35" style="left:400px; top:200px; position:absolute; width:100px; height:100px;"></div>
<div id="A41" style="left:0px; top:300px; position:absolute; width:100px; height:100px;"></div>
<div id="A42" style="left:100px; top:300px; position:absolute; width:100px; height:100px;"></div>
<div id="A43" style="left:200px; top:300px; position:absolute; width:100px; height:100px;"></div>
<div id="A44" style="left:300px; top:300px; position:absolute; width:100px; height:100px;"></div>
<div id="A45" style="left:400px; top:300px; position:absolute; width:100px; height:100px;"></div>
<div id="A51" style="left:0px; top:400px; position:absolute; width:100px; height:100px;"></div>
<div id="A52" style="left:100px; top:400px; position:absolute; width:100px; height:100px;"></div>
<div id="A53" style="left:200px; top:400px; position:absolute; width:100px; height:100px;"></div>
<div id="A54" style="left:300px; top:400px; position:absolute; width:100px; height:100px;"></div>
<div id="A55" style="left:400px; top:400px; position:absolute; width:100px; height:100px;"></div>
</div>
</body>
</html>
JavaScript File
var qpBkdg = null;

var qppBoard = null;

var qppMap = null;

var iLocX = 10;

var iLocY = 10;
function KeyHandler(qKeyEvent) {
var iKeyDown = 0;
var iLeftArrow = 37;
var iUpArrow = 38;
var iRightArrow = 39;
var iDownArrow = 40;
if (qKeyEvent) {
iKeyDown = qKeyEvent.which;
} else {
iKeyDown = window.event.keyCode;
}
if (iKeyDown === iLeftArrow) {
if (iLocX > 0) {
iLocX = iLocX - 1;
}
} else if (iKeyDown === iRightArrow) {
if (iLocX < 19) {
iLocX = iLocX + 1;
}
} else if (iKeyDown === iUpArrow) {
if (iLocY > 0) {
iLocY = iLocY - 1;
}
} else if (iKeyDown === iDownArrow) {
if (iLocY < 19) {
iLocY = iLocY + 1;
}
}
ColorBoard();
return false;
}
function GetRandomColor() {
var iRnd = Math.floor(Math.random()*10);
switch(iRnd) {
case 0:
{
return 'gray';
}
case 1:
{
return 'brown';
}
case 2:
{
return 'lime';
}
default:
{
return 'green';
}
}
}
function ColorBoard() {
for (var iY = iLocY - 2; iY < iLocY + 3; iY++) {
for (var iX = iLocX - 2; iX < iLocX + 3; iX++) {
if (iY < 0 || iX < 0 || iY > 19 || iX > 19) {
qppBoard[iY - iLocY + 2][iX - iLocX + 2].style.backgroundColor = 'black';
} else {
qppBoard[iY - iLocY + 2][iX - iLocX + 2].style.backgroundColor = qppMap[iY][iX];
}
}
}
}
function Initialize() {
// Generate map
qppMap = new Array(20);
for (var iY = 0; iY < 20; iY++) {
qppMap[iY] = new Array(20);
for (var iX = 0; iX < 20; iX++) {
qppMap[iY][iX] = GetRandomColor();
}
}
// Allocate the visible board
qppBoard = new Array(5);
for (var iY = 0; iY < 5; iY++) {
qppBoard[iY] = new Array(5);
for (var iX = 0; iX < 5; iX++) {
qppBoard[iY][iX] = document.getElementById('A'+((iY+1)*10+(iX+1)));
}
}
ColorBoard();
document.onkeydown = KeyHandler;
qpBkdg = document.getElementById('gameboard');
}
window.onload = Initialize;

 RSS
RSS Atom
Atom Feedburner
