Bits & Bytes

Posts Tagged ‘microsoft’

Creating a Simple Form to Display Text Messages in C#

Although it is possible to use a simple MessageBox for printing messages, it is sometimes convenient to use a window that you have more control over. Below, I have the C# code for a simple console application named “MyConsoleApplication.” I created the project using the Console Application template, which creates the empty Main() function shown below. The code file is named “Program.cs” for simplicity, but it could be named anything.

We need to add a reference to the assembly System.Windows.Forms, in order to be able create Forms in the code. We also need to add the corresponding using directive using System.Windows.Forms; at the top of the code file. Finally, we need to add a reference to the assembly System.Drawing in order to set the size of the Form in the line: qMyForm.ClientSize = qMyTextbox.Size;.

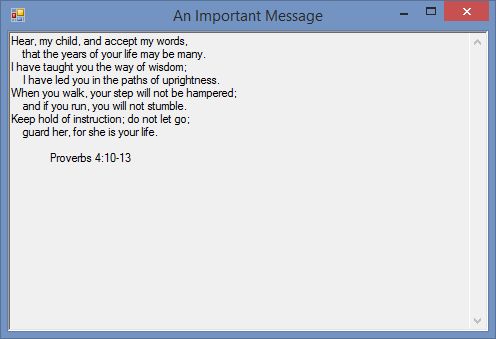
Beyond that, the code that I have added is all inside the Main() function. First, I create a Form and add the text “An Important Message” to the title bar. Next, I create a TextBox and set its size to 400 by 300 pixels. Then I set it to accept multiple lines of text, enable the vertical scrollbar to accommodate text overruns, and set it to be read only so that the text cannot be modified.

The middle block of code consists of several calls to the member function AppendText(). Each call adds a line of text from the Bible, Proverbs 4:10-13. The character sequence \u000D\u000A is the unicode representation of the carriage return and linefeed characters. So, that moves the text to the beginning of the next line. On a related note, the TextBox has word wrap enabled by default.

The third block of code sets the size of the containing Form to have a client area that is the same size as the TextBox. Then the TextBox is added to the Form, and the Form is displayed via a call to ShowDialog().

The output of the program looks like this:

Program.cs

using System;
using System.Collections.Generic;
using System.Linq;
using System.Text;
using FormStringOutput;
using System.Windows.Forms;

namespace MyConsoleApplication
{
    class Program
    {
        static void Main(string[] args)
        {
            Form qMyForm = new Form();
            // Sets the title bar text
            qMyForm.Text = "An Important Message";
            TextBox qMyTextbox = new TextBox();
            qMyTextbox.SetBounds(0, 0, 400, 300);
            qMyTextbox.Multiline = true;
            qMyTextbox.ScrollBars = ScrollBars.Vertical;
            qMyTextbox.ReadOnly = true;

            // Add messages via AppendText, using '\u000D\u000A' for new line characters
            qMyTextbox.AppendText("Hear, my child, and accept my words,\u000D\u000A");
            qMyTextbox.AppendText("    that the years of your life may be many.\u000D\u000A");
            qMyTextbox.AppendText("I have taught you the way of wisdom;\u000D\u000A");
            qMyTextbox.AppendText("    I have led you in the paths of uprightness.\u000D\u000A");
            qMyTextbox.AppendText("When you walk, your step will not be hampered;\u000D\u000A");
            qMyTextbox.AppendText("    and if you run, you will not stumble.\u000D\u000A");
            qMyTextbox.AppendText("Keep hold of instruction; do not let go;\u000D\u000A");
            qMyTextbox.AppendText("    guard her, for she is your life.\u000D\u000A");
            qMyTextbox.AppendText("\u000D\u000A             Proverbs 4:10-13\u000D\u000A");

            // Set the client area of the form equal to the size of the Text Box
            qMyForm.ClientSize = qMyTextbox.Size;
            // Add the Textbox to the form
            qMyForm.Controls.Add(qMyTextbox);
            // Display the form
            qMyForm.ShowDialog();
        }
    }
}

Fix for Windows 8.1 Apps Crashing – cannot find ms-windows-store: purgecaches

I just had this error and fixed it. The problem displays itself when you try to open an 8.1 app. The app opens and then closes quickly. I looked around for fixes and tried everything that I could, but I had to fix it myself in the end. Other suggested methods are listed below, in case you need them or if you want to try them first. Please leave a comment to let us know which one works.

The solution is simple and avoids having to do a full restoration and wiping out everything. Basically, I did a system restore. Microsoft Windows 8.1 creates restoration points when actions that it considers potentially harmful are performed. Restoration allows you to go back in time to a previous state, and the process is reversible. You can do it like this:

WARNING: Before you perform a restore, be sure to back up your personal files. Contrary to the claims by Microsoft, they will be affected. Cloud storage works well for this. You can put them on One Drive while you perform the restoration.

Method 1 – Restore from a restore point


  1. Open the Control Panel
    1. Move the cursor to the upper-right corner of the screen and pull it down along the edge of the screen until you are over the Settings icon.
    2. Left-click the “Settings” icon to open the Settings menu.
    3. In the settings menu, left-click “Control Panel” icon to open the Control Panel dialog.
  2. Left-click “System Security” at the top-left.
  3. Left-click “Action Center” at the top.
  4. Left-click “Recovery” at the bottom-right of the dialog
  5. Left-click “Open System Restore” to open the System Restore dialog
  6. Left-click the “Next” button to open a list of restore points. If
  7. Left-click the check box next to “Show more restore points” if you like.
  8. Choose a restore point and left-click it to select it. Be sure that your files are backed up and close your running applications because the OS will perform a restart.
  9. Left-click the “Next” button and finish the restoration steps.
  10. Windows should indicate what it is doing. Wait for the restart to log in and test it.

Note: if this did not work, you can follow the steps to completely undo the restoration and try one of the methods below.

Method 2 – WSReset


  1. Make sure that you are logged in with an Administrator account.
  2. Right-click the Windows icon in the lower-left corner of the screen to open the context menu.
  3. Left-click “Command Prompt (Admin)” to open a command prompt. (UAC will request that you allow this to make changes to your computer. Left-click the “Yes” button.)
  4. Enter wsreset in the “Administrator: Command Prompt” window and press Enter.

If this fails, it should give you the message “cannot find ms-windows-store:purgecaches.” Otherwise, open the app store to see if this fixed it.

Method 3 – System File Check


  1. Make sure that you are logged in with an Administrator account.
  2. Right-click the Windows icon in the lower-left corner of the screen to open the context menu.
  3. Left-click “Command Prompt (Admin)” to open a command prompt. (UAC will request that you allow this to make changes to your computer. Left-click the “Yes” button.)
  4. Enter sfc /scannow in the “Administrator: Command Prompt” window and press Enter.

Method 4 – Re-register the Store App


  1. Make sure that you are logged in with an Administrator account.
  2. Right-click the Windows icon in the lower-left corner of the screen to open the context menu.
  3. Left-click “Command Prompt (Admin)” to open a command prompt. (UAC will request that you allow this to make changes to your computer. Left-click the “Yes” button.)
  4. Enter

    powershell -ExecutionPolicy Unrestricted Add-AppxPackage -DisableDevelopmentMode -Register $Env:SystemRoot\WinStore\AppxManifest.XML

    in the “Administrator: Command Prompt” window and press Enter.

Method 5 – Troubleshooter


Try downloading and running the troubleshooter from Microsoft: http://go.microsoft.com/fwlink/p/?LinkId=268423

As always, you might want to try restarting your machine after trying these.


Keeping the C++ Console Window Open

One of the first problems that new C++ programmers have is keeping the console window open when writing C++ programs. The easiest solution to this problem is to use the Start Without Debugging option under the Debug the when executing programs. Unfortunately, Microsoft took this option and many others out of the default menus in Visual C++ 2010. To get this option back, select Tools->Settings->Expert Settings. Otherwise, you can use press (Ctrl + F5) to select Start Without Debugging without the menu.

That’s the simplest option for keeping the console window open. However, if you want to keep the window open when running an executable that you create, you will need to add some code to suspend execution and keep the window open. Below, we show one example of how to keep the window open by adding this line of code before the return statement:

system("pause");

The one objection I have to this method is that the system() function is not part of the C++ standard and may not be valid with some C++ compilers.

#include <iostream>

int main()
{
    using namespace std;

    cout << "Hello World!" << endl;

    system("pause");
    return 0;
}

Alternatively, we could use cin.get(); to keep the window open like this:

#include <iostream>

int main()
{
    using namespace std;

    cout << "Hello World!" << endl;

    cin.get();
    return 0;
}

However, using cin.get() can have problems if input is taken directly before it. The problem is that the input in the stream carries over to the cin.get() and causes the program to exit. To prevent this, we can add a call to clear() and ignore(), as we do below.

#include <iostream>

int main()
{
    using namespace std;

    int iInt;
    cin >> iInt;
    cout << "Input = " << iInt << endl;

    cin.clear();
    cin.ignore(0xFFFFFFFF, '\n');
    cin.get();
    return 0;
}
 

© 2007–2024 XoaX.net LLC. All rights reserved.