Bits & Bytes

Posts Tagged ‘programming’

Rendering Transparent 3D Surfaces in WPF with C#

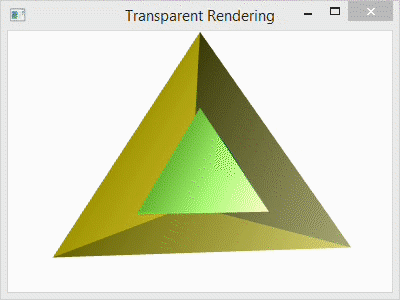
The primary problems that arise when rendering semi-transparent 3d objects in Windows Presentation Foundation have to do with false z-buffer occlusions. Specifically, when a transparent surface or polygon is rendered, it sets the z-buffer depth values to block objects that are behind it from being rendered, even though they should show through the transparent layer.

In WPF with C#, the z-buffer is not accessible. So, it can not be disabled during transparent rendering. Instead, we must render the transparent objects last so that they are layered over the rest of the scene and the objects behind them show through.

RotatingTransTetra

Below, I have a program for the single code file that I used to generate the spinning, transparent tetrahedron shown above. The C# project that I used is a simple Console Application project with the libraries PresentationCore, PresentationFramework, and WindowsBase references added to it as I showed in a prior post: Using WPF in a C# Console Application. The Main() function creates the Window for the program and calls TransparentScene() to do all of the rendering.

Inside the function TransparentScene(), I create the camera, the light, the animated rotation transformation, the tetrahedron geometry, and then use that geometry to specify three tetrahedrons. The first tetrahedron is called the Inner Tetrahedron because it is scaled to fit inside the others. The second tetrahedron is called the Outer Tetrahedron and is semi-transparent. The third tetrahedron is also part of the Outer Tetrahedron, but consists of the opaque back faces. Note that it only makes sense to render the back faces because the front faces are semi-transparent. Otherwise, the back would not be visible.

At the end the code, I use the following lines to add the tetrahedrons to the scene:

            qModelGroup.Children.Add(qBackGeometry);
            qModelGroup.Children.Add(qInnerGeometry);
            qModelGroup.Children.Add(qOuterGeometry);

Notice that the transparent “Outer Geometry” layer is added last. This is necessary to avoid false occlusions.

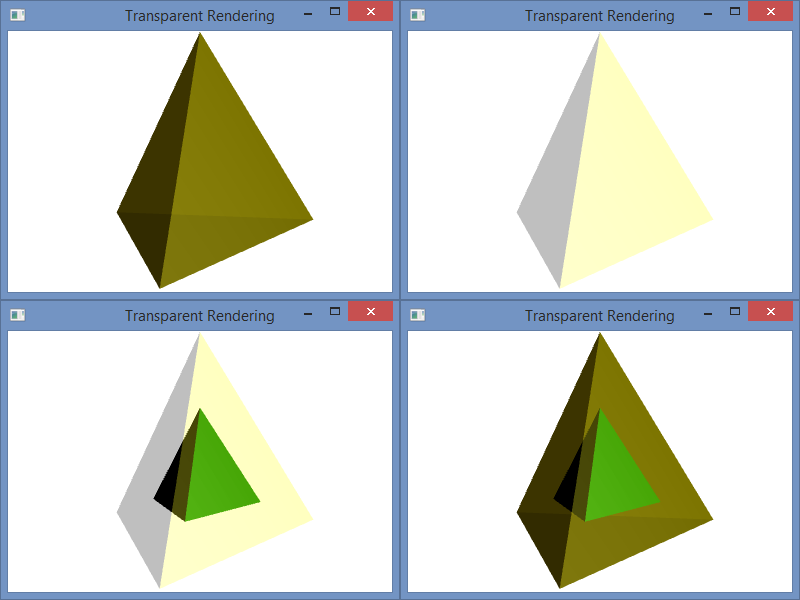
For comparison, I have included the image below with four different arrangements. The first (top-left) shows the scene with the transparent outer layer added before the inner and after the back. The second (top-right) shows the transparent outer layer added before both the inner and the back layers. The third (bottom-left) shows the transparent layer added before the back and after the inner layer. The last (bottom-right) shows the scene with the transparent layer added last as it is in the code.

TransparentComparison

Program.cs

using System;
using System.Windows;
using System.Windows.Controls;
using System.Windows.Media;
using System.Windows.Media.Media3D;
using System.Windows.Media.Animation;

namespace WpfTransparent {
    class Program {
        [STAThread]
        static void Main(string[] args) {
            Window qWindow = new Window();
            qWindow.Title = "Transparent Rendering";
            qWindow.Width = 400;
            qWindow.Height = 300;
            qWindow.Content = TransparentScene();
            qWindow.ShowDialog();
        }

        static Viewport3D TransparentScene() {
            // Define the camera
            PerspectiveCamera qCamera = new PerspectiveCamera();
            qCamera.Position = new Point3D(0, .25, 2.25);
            qCamera.LookDirection = new Vector3D(0, -.05, -1);
            qCamera.UpDirection = new Vector3D(0, 1, 0);
            qCamera.FieldOfView = 60;

            // Define a lighting model
            DirectionalLight qLight = new DirectionalLight();
            qLight.Color = Colors.White;
            qLight.Direction = new Vector3D(-0.5, -0.25, -0.5);

            // Define the animated rotation transformation
            RotateTransform3D qRotation =
                new RotateTransform3D(new AxisAngleRotation3D(new Vector3D(0, 1, 0), 1));
            DoubleAnimation qAnimation = new DoubleAnimation();
            qAnimation.From = 1;
            qAnimation.To = 361;
            qAnimation.Duration = new Duration(TimeSpan.FromMilliseconds(5000));
            qAnimation.RepeatBehavior = RepeatBehavior.Forever;
            qRotation.Rotation.BeginAnimation(AxisAngleRotation3D.AngleProperty, qAnimation);

            // Define the geometry
            const double kdSqrt2 = 1.4142135623730950488016887242097;
            const double kdSqrt6 = 2.4494897427831780981972840747059;
            // Create a collection of vertex positions
            Point3D[] qaV = new Point3D[4]{
                new Point3D(0.0, 1.0, 0.0),
                new Point3D(2.0 * kdSqrt2 / 3.0, -1.0 / 3.0, 0.0),
                new Point3D(-kdSqrt2 / 3.0, -1.0 / 3.0, -kdSqrt6 / 3.0),
                new Point3D(-kdSqrt2 / 3.0, -1.0 / 3.0, kdSqrt6 / 3.0)};
            Point3DCollection qPoints = new Point3DCollection();
            // Designate Vertices
            // My Scheme (0, 1, 2), (1, 0, 3), (2, 3, 0), (3, 2, 1)
            for (int i = 0; i < 12; ++i) {
                if ((i/3) % 2 == 0) {
                    qPoints.Add(qaV[i%4]);
                } else { 
                    qPoints.Add(qaV[(i*3)%4]);
                }
            }
            // Designate Triangles
            Int32Collection qTriangles = new Int32Collection();
            for (int i = 0; i < 12; ++i ) {
                qTriangles.Add(i);
            }
            Int32Collection qBackTriangles = new Int32Collection();
            // Designate Back Triangles in the opposite orientation
            for (int i = 0; i < 12; ++i) {
                qBackTriangles.Add(3 * (i / 3) + (2 * (i % 3) % 3));
            }

            // Inner Tetrahedron: Define the mesh, material and transformation.
            MeshGeometry3D qFrontMesh = new MeshGeometry3D();
            qFrontMesh.Positions = qPoints;
            qFrontMesh.TriangleIndices = qTriangles;
            GeometryModel3D qInnerGeometry = new GeometryModel3D();
            qInnerGeometry.Geometry = qFrontMesh;
            // *** Material ***
            DiffuseMaterial qDiffGreen =
                new DiffuseMaterial(new SolidColorBrush(Color.FromArgb(255, 0, 128, 0)));
            SpecularMaterial qSpecWhite = new
                SpecularMaterial(new SolidColorBrush(Color.FromArgb(255, 255, 255, 255)), 30.0);
            MaterialGroup qInnerMaterial = new MaterialGroup();
            qInnerMaterial.Children.Add(qDiffGreen);
            qInnerMaterial.Children.Add(qSpecWhite);
            qInnerGeometry.Material = qInnerMaterial;
            // *** Transformation ***
            ScaleTransform3D qScale = new ScaleTransform3D(new Vector3D(.5, .5, .5));
            Transform3DGroup myTransformGroup = new Transform3DGroup();
            myTransformGroup.Children.Add(qRotation);
            myTransformGroup.Children.Add(qScale);
            qInnerGeometry.Transform = myTransformGroup;

            // Outer Tetrahedron (semi-transparent) : Define the mesh, material and transformation.
            GeometryModel3D qOuterGeometry = new GeometryModel3D();
            qOuterGeometry.Geometry = qFrontMesh;
            // *** Material ***
            DiffuseMaterial qDiffTransYellow =
                new DiffuseMaterial(new SolidColorBrush(Color.FromArgb(64, 255, 255, 0)));
            SpecularMaterial qSpecTransWhite =
                new SpecularMaterial(new SolidColorBrush(Color.FromArgb(128, 255, 255, 255)), 30.0);
            MaterialGroup qOuterMaterial = new MaterialGroup();
            qOuterMaterial.Children.Add(qDiffTransYellow);
            qOuterMaterial.Children.Add(qSpecTransWhite);
            qOuterGeometry.Material = qOuterMaterial;
            // *** Transformation ***
            qOuterGeometry.Transform = qRotation;

            // Outer Tetrahedron (solid back) : Define the mesh, material and transformation.
            MeshGeometry3D qBackMesh = new MeshGeometry3D();
            qBackMesh.Positions = qPoints;
            qBackMesh.TriangleIndices = qBackTriangles;
            GeometryModel3D qBackGeometry = new GeometryModel3D();
            qBackGeometry.Geometry = qBackMesh;
            // *** Material ***
            DiffuseMaterial qDiffBrown =
                new DiffuseMaterial(new SolidColorBrush(Color.FromArgb(255, 200, 175, 0)));
            qBackGeometry.Material = qDiffBrown;
            // *** Transformation ***
            qBackGeometry.Transform = qRotation;

            // Collect the components
            Model3DGroup qModelGroup = new Model3DGroup();
            qModelGroup.Children.Add(qLight);
            qModelGroup.Children.Add(qBackGeometry);
            qModelGroup.Children.Add(qInnerGeometry);
            qModelGroup.Children.Add(qOuterGeometry);
            ModelVisual3D qVisual = new ModelVisual3D();
            qVisual.Content = qModelGroup;
            Viewport3D qViewport = new Viewport3D();
            qViewport.Children.Add(qVisual);
            qViewport.Camera = qCamera;

            return qViewport;
        }
    }
}

Creating a Simple Form to Display Text Messages in C#

Although it is possible to use a simple MessageBox for printing messages, it is sometimes convenient to use a window that you have more control over. Below, I have the C# code for a simple console application named “MyConsoleApplication.” I created the project using the Console Application template, which creates the empty Main() function shown below. The code file is named “Program.cs” for simplicity, but it could be named anything.

We need to add a reference to the assembly System.Windows.Forms, in order to be able create Forms in the code. We also need to add the corresponding using directive using System.Windows.Forms; at the top of the code file. Finally, we need to add a reference to the assembly System.Drawing in order to set the size of the Form in the line: qMyForm.ClientSize = qMyTextbox.Size;.

Beyond that, the code that I have added is all inside the Main() function. First, I create a Form and add the text “An Important Message” to the title bar. Next, I create a TextBox and set its size to 400 by 300 pixels. Then I set it to accept multiple lines of text, enable the vertical scrollbar to accommodate text overruns, and set it to be read only so that the text cannot be modified.

The middle block of code consists of several calls to the member function AppendText(). Each call adds a line of text from the Bible, Proverbs 4:10-13. The character sequence \u000D\u000A is the unicode representation of the carriage return and linefeed characters. So, that moves the text to the beginning of the next line. On a related note, the TextBox has word wrap enabled by default.

The third block of code sets the size of the containing Form to have a client area that is the same size as the TextBox. Then the TextBox is added to the Form, and the Form is displayed via a call to ShowDialog().

The output of the program looks like this:

Program.cs

using System;
using System.Collections.Generic;
using System.Linq;
using System.Text;
using FormStringOutput;
using System.Windows.Forms;

namespace MyConsoleApplication
{
    class Program
    {
        static void Main(string[] args)
        {
            Form qMyForm = new Form();
            // Sets the title bar text
            qMyForm.Text = "An Important Message";
            TextBox qMyTextbox = new TextBox();
            qMyTextbox.SetBounds(0, 0, 400, 300);
            qMyTextbox.Multiline = true;
            qMyTextbox.ScrollBars = ScrollBars.Vertical;
            qMyTextbox.ReadOnly = true;

            // Add messages via AppendText, using '\u000D\u000A' for new line characters
            qMyTextbox.AppendText("Hear, my child, and accept my words,\u000D\u000A");
            qMyTextbox.AppendText("    that the years of your life may be many.\u000D\u000A");
            qMyTextbox.AppendText("I have taught you the way of wisdom;\u000D\u000A");
            qMyTextbox.AppendText("    I have led you in the paths of uprightness.\u000D\u000A");
            qMyTextbox.AppendText("When you walk, your step will not be hampered;\u000D\u000A");
            qMyTextbox.AppendText("    and if you run, you will not stumble.\u000D\u000A");
            qMyTextbox.AppendText("Keep hold of instruction; do not let go;\u000D\u000A");
            qMyTextbox.AppendText("    guard her, for she is your life.\u000D\u000A");
            qMyTextbox.AppendText("\u000D\u000A             Proverbs 4:10-13\u000D\u000A");

            // Set the client area of the form equal to the size of the Text Box
            qMyForm.ClientSize = qMyTextbox.Size;
            // Add the Textbox to the form
            qMyForm.Controls.Add(qMyTextbox);
            // Display the form
            qMyForm.ShowDialog();
        }
    }
}

Using Arrays in JavaScript

Arrays are containers that hold a sequence of objects that can be accessed via the bracket operator [] and an integer index. Since JavaScript is not a strongly-typed language, JavaScript arrays are very versatile and can hold objects of different types. In this post, I will focus on the basic syntax and usage.

Below, we have the code for an HTML file and a JavaScript file. The HTML file is essentially blank; it is simply used to call the JavaScript file, “Arrays.js,” and execute the code. The rest is boilerplate code that I reuse for all of my JavaScript posts.

The JavaScript code file, “Arrays.js,” contains the entire JavaScript program. In it, I first declare the variable, qaPaintings, and assign it the value [], which makes the variable an Array object with zero elements in it. Then the first entry at index 0 is set to hold a new Image object and its source is set to be the Michelangelo’s painting of the creation of the Sun and the Moon from the Sistene Chapel that was painted in 1511 AD. The call to appendChild() adds the image to the document so that it is displayed.

The same thing is then done for the entries at 1 and 2 in the array. These are assigned the source images of the painting The Descent of the Holy Ghost by Titian circa 1545 AD and the painting of The Last Judgment from the Sistene Chapel by Michelangelo that was completed between 1536 AD and 1541 AD.

All of this shows how to create an array and assign values to its elements. Notice that when we first created the array, it had zero elements. By assigning values to the entries at 0, 1, and 2, we caused the array to be extended each time. Automatic array resizing is a convenient property of JavaScript arrays that differs from other languages like C++. In fact, JavaScript arrays

Arrays.html

<!DOCTYPE html PUBLIC "-//W3C//DTD XHTML 1.0 Transitional//EN"
   "http://www.w3.org/TR/xhtml1/DTD/xhtml1-transitional.dtd">
<html xmlns="http://www.w3.org/1999/xhtml" xml:lang="en" lang="en">
<head>
  <meta http-equiv="Content-Type" content="text/html;charset=utf-8" />
  <title>XoaX.net</title>
</head>
<body>
  <script type="text/javascript" src="Arrays.js"></script>
</body>
</html>

Arrays.js

var qaPaintings = [];

qaPaintings[0] = new Image();
qaPaintings[0].src = "SisteneChapel_Michelangelo_1511_1.jpg"
document.body.appendChild(qaPaintings[0]);

qaPaintings[1] = new Image();
qaPaintings[1].src = "TheDescentOfTheHolyGhost_Titian_2.jpg"
document.body.appendChild(qaPaintings[1]);

qaPaintings[2] = new Image();
qaPaintings[2].src = "TheLastJudgment_Michelangelo_3.jpg"
document.body.appendChild(qaPaintings[2]);
 

© 2007–2024 XoaX.net LLC. All rights reserved.