Bits & Bytes

Posts Tagged ‘html’

How to Fix Problems with Displaying SVG Images within an HTML Image Element

Suppose that you have an image element inside of an HTML file, like this one:

<img width="30px" height="40px" src= "MyImage.svg"  />

and your SVG file, “MyImage.svg”, looks like this:

<svg width="30" height="40" xmlns="http://www.w3.org/2000/svg">
  <image href="Christ.png" x="10" y="20" width="20" height="20"></image>
</svg>

In this case, the image inside the svg, “Christ.png”, will not display because the image element will not allow the reference to the external file “Christ.png”.

However, this can be fixed in a few different ways:

  1. Change the image element to an embed element:

    <embed width=”20px” height=”20px” src= “MyImage.svg” />

  2. Eliminate the image element and include the svg element in the HTML directly.
  3. Convert the image into a 64 bit data URI

If you have never seen a 64 bit data URI, they look something like this:

data:image/png;base64,iVBORw0KGgoAAAANSUhEUgAAABQAAAAUCAIAAAAC64paAAAAB3RJT
UUH5AQCFiQbfa5q9wAAAAlwSFlzAAALEgAACxIB0t1+/AAAAARnQU1BAACxjwv8YQUAAAHgSURB
VHjaY2DABhwMRVuClcvsGBJMGcJtJHXleRiIByH2MunOkuXJbl059rneUlbqfCRo9tYRaQyUaS8
JaC/0LgpXtdMTwVDCCCKUBVgdVEW8TWQyPOWT3eQKgpTzQ1SLI3Uakg0qY9XKo1TrknXzwtQTgb
Je8h5m8vbGqhEOig4afHK8nCD9oSYSaT7aMwpMJqWrNsaqT8jS6cky6Mq17M4178k3a8iwzI82S
vBRi3BRDLOVrQpXL43QdtcTYGBggljPICrCqafAn2wv3ZKkoSXNYyAp4GMuE2Al52ok6WslHe4g
E+8qmxuouaDSNM9PztdYRFmAC8X9EDC3TK8tXRvIyPWVK/STKfCSLvSS0ZHnY2PgWFZjXJOoBZR
iZWDmYWHGGliMAcZiIVYSTYmaJf4K2W6yGe4qCU7iC8r1OjI0iQptbXHuPB/FCSmqk9JUp2arzi
vTSvSWwXAlDsAEUsIOdGBZgOyBKbYuFsJAPhszQX0wUBWmFmApo8MgHO+gBDKJhYRkwtCdrjQ5R
9lRVSreQ4kUfWBgJsfZnaQ2IU8nO1iOZM1SvBw1UVpZPvJANjPxvoUANQHWSAtxG01hkq0FAm5m
Fl4GblYGdkbCkYMBWBgZhdjZWJiYyLF5cAMAegthBPCMZ8AAAAAASUVORK5CYII=

Warning: 64 bit data URI encoded images can be quite long, even for a moderately-sized image. The text above was generate for the small 20 pixel by 20 pixel image shown here:

So, instead of our original svg element, we could use this one with a 64 bit encoded data URI:

<svg width="30" height="40" xmlns="http://www.w3.org/2000/svg">
  <image x="10" y="20" width="20" height="20" href="data:image/png;base64
  ,iVBORw0KGgoAAAANSUhEUgAAABQAAAAUCAIAAAAC64paAAAAB3RJTUUH5AQCFiQbfa5q9w
  AAAAlwSFlzAAALEgAACxIB0t1+/AAAAARnQU1BAACxjwv8YQUAAAHgSURBVHjaY2DABhwMR
  VuClcvsGBJMGcJtJHXleRiIByH2MunOkuXJbl059rneUlbqfCRo9tYRaQyUaS8JaC/0LgpX
  tdMTwVDCCCKUBVgdVEW8TWQyPOWT3eQKgpTzQ1SLI3Uakg0qY9XKo1TrknXzwtQTgbJe8h5
  m8vbGqhEOig4afHK8nCD9oSYSaT7aMwpMJqWrNsaqT8jS6cky6Mq17M4178k3a8iwzI82Sv
  BRi3BRDLOVrQpXL43QdtcTYGBggljPICrCqafAn2wv3ZKkoSXNYyAp4GMuE2Al52ok6WslH
  e4gE+8qmxuouaDSNM9PztdYRFmAC8X9EDC3TK8tXRvIyPWVK/STKfCSLvSS0ZHnY2PgWFZj
  XJOoBZRiZWDmYWHGGliMAcZiIVYSTYmaJf4K2W6yGe4qCU7iC8r1OjI0iQptbXHuPB/FCSm
  qk9JUp2arzivTSvSWwXAlDsAEUsIOdGBZgOyBKbYuFsJAPhszQX0wUBWmFmApo8MgHO+gBD
  KJhYRkwtCdrjQ5R9lRVSreQ4kUfWBgJsfZnaQ2IU8nO1iOZM1SvBw1UVpZPvJANjPxvoUAN
  QHWSAtxG01hkq0FAm5mFl4GblYGdkbCkYMBWBgZhdjZWJiYyLF5cAMAegthBPCMZ8AAAAAA
  SUVORK5CYII="/>
</svg>

Using Arrays in JavaScript

Arrays are containers that hold a sequence of objects that can be accessed via the bracket operator [] and an integer index. Since JavaScript is not a strongly-typed language, JavaScript arrays are very versatile and can hold objects of different types. In this post, I will focus on the basic syntax and usage.

Below, we have the code for an HTML file and a JavaScript file. The HTML file is essentially blank; it is simply used to call the JavaScript file, “Arrays.js,” and execute the code. The rest is boilerplate code that I reuse for all of my JavaScript posts.

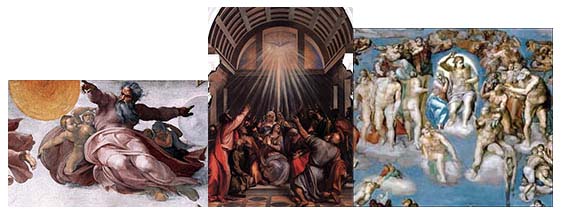
The JavaScript code file, “Arrays.js,” contains the entire JavaScript program. In it, I first declare the variable, qaPaintings, and assign it the value [], which makes the variable an Array object with zero elements in it. Then the first entry at index 0 is set to hold a new Image object and its source is set to be the Michelangelo’s painting of the creation of the Sun and the Moon from the Sistene Chapel that was painted in 1511 AD. The call to appendChild() adds the image to the document so that it is displayed.

The same thing is then done for the entries at 1 and 2 in the array. These are assigned the source images of the painting The Descent of the Holy Ghost by Titian circa 1545 AD and the painting of The Last Judgment from the Sistene Chapel by Michelangelo that was completed between 1536 AD and 1541 AD.

All of this shows how to create an array and assign values to its elements. Notice that when we first created the array, it had zero elements. By assigning values to the entries at 0, 1, and 2, we caused the array to be extended each time. Automatic array resizing is a convenient property of JavaScript arrays that differs from other languages like C++. In fact, JavaScript arrays

Arrays.html

<!DOCTYPE html PUBLIC "-//W3C//DTD XHTML 1.0 Transitional//EN"
   "http://www.w3.org/TR/xhtml1/DTD/xhtml1-transitional.dtd">
<html xmlns="http://www.w3.org/1999/xhtml" xml:lang="en" lang="en">
<head>
  <meta http-equiv="Content-Type" content="text/html;charset=utf-8" />
  <title>XoaX.net</title>
</head>
<body>
  <script type="text/javascript" src="Arrays.js"></script>
</body>
</html>

Arrays.js

var qaPaintings = [];

qaPaintings[0] = new Image();
qaPaintings[0].src = "SisteneChapel_Michelangelo_1511_1.jpg"
document.body.appendChild(qaPaintings[0]);

qaPaintings[1] = new Image();
qaPaintings[1].src = "TheDescentOfTheHolyGhost_Titian_2.jpg"
document.body.appendChild(qaPaintings[1]);

qaPaintings[2] = new Image();
qaPaintings[2].src = "TheLastJudgment_Michelangelo_3.jpg"
document.body.appendChild(qaPaintings[2]);

Clipping in JavaScript with Absolute Positioning

If you program games in JavaScript, you will often find it necessary to clip the region of an image that lies outside of the viewport. The solution is easy, but not obvious. The elements in a game are generally positioned using the “absolute” positioning designation: For example, the line qrMadonna.style.position = “absolute”; in the program below sets the positioning that the image of the Madonna, qrMadonna, refers to to absolute. (For an explanation of absolute positioning, see our post on positioning elements.)

Below, we have the code for an HTML file and a JavaScript file. The HTML file is essentially blank; it is simply used to call the JavaScript file, “ClipImage.js” and execute the code.

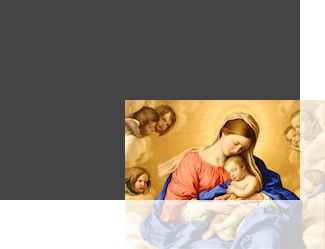
The file “ClipImage.js” contains four variables that refer to four nested HTML elements. The outermost element is the body; this element was created in the HTML file and is retrieved via a call to the getElementsByTagName() function, along with the array operator. After this, we create a div called qrOuterDiv to hold everything; this outer div is created to allow the code inside to flow normally, since it does not have absolute positioning (Otherwise, it is not needed.) The next element is qrInnerDiv, and it contains the image element that we are clipping; it is necessary that this element have its position as “absolute” and its overflow as “hidden”. Finally, the image element qrImage is 200×149 and is positioned at (125, 100) inside of the div, which is 300×200. So, the image hangs outside of the div by 25 and 49 pixels, respectively.

To illustrate this, we have an resulting image of what this clipping looks like below. The faint region that lies outside the dark gray rectangle is actually clipped. We show this region so that you can see what has been clipped. We also have the original image of the “Madonna and Child with Cherubs” that we used in the example, at the top of the article.

HTML File: “ClipImage.html”


<!DOCTYPE html PUBLIC "-//W3C//DTD XHTML 1.0 Transitional//EN"
"http://www.w3.org/TR/xhtml1/DTD/xhtml1-transitional.dtd">
<html xmlns="http://www.w3.org/1999/xhtml" xml:lang="en" lang="en">
<head>
    <meta http-equiv="Content-Type" content="text/html;charset=utf-8" />
    <title>XoaX.net's Javascript Clipping Example</title>
</head>
<body>
    <script type="text/javascript" src="ClipImage.js"></script>
</body>
</html>

JavaScript File: “ClipImage.js”


var qrBody;
var qrOuterDiv;
var qrInnerDiv;
var qrImage;

function PageLoaded() {
    // Get the main body element, first/only element of array
    qrBody = document.getElementsByTagName("body")[0];

    qrOuterDiv = document.createElement("div");
    qrBody.appendChild(qrOuterDiv);

    qrInnerDiv = document.createElement("div");
    qrInnerDiv.style.backgroundColor = "#444444";
    qrInnerDiv.style.width = "300px";
    qrInnerDiv.style.height = "200px";
    qrInnerDiv.style.position = "absolute";
    qrInnerDiv.style.overflow = "hidden";
    qrOuterDiv.appendChild(qrInnerDiv);

    qrImage = document.createElement("img");
    qrImage.src = "MadonnaAndChildWithCherubs.jpg";
    qrImage.style.position = "absolute";
    qrImage.style.left = "125px";
    qrImage.style.top = "100px";
    qrInnerDiv.appendChild(qrImage);
}

window.onload = PageLoaded;


© 2007–2024 XoaX.net LLC. All rights reserved.