Bits & Bytes

Posts Tagged ‘3.0’

Declaring and Using Arrays in Actionscript 3.0

Arrays in Actionscript are extremely flexible; there are many ways to declare and assign values to an array in Actionscript. We can use functions, bracket notation, or constructors to create an Array object. We also have several ways to fill the entries of an Array object.

It is important to note that an Array in Actionscript is an object. So, an Actionscript Array is very different from say an array in C/C++. In fact, Arraysin Actionscript can hold many different types of data, which is different from arrays in most languages. However, Actionscript does also have a Vector type, which is similar to a traditional array in that, for efficiency, it is limited to holding only one type of data.

One dimensional Arrays are pretty straight-forward in how they can be declared and used. However, there are multiple methods for creating one-dimensional Arrays, which can be put together in numerous combinations to created multi-dimensional Array objects.

One-Dimensional Arrays

Function Notation

  1. var aMyArray:Array = Array();
  2. var aMyArray:Array = Array(3);
  3. var aMyArray:Array = Array(qMyObject);

Bracket Notation

  1. var aMyArray:Array = [“XoaX.net”, 17];

Contructor Notation

  1. var aMyArray:Array = new Array();
  2. var aMyArray:Array = new Array(3);
  3. var aMyArray:Array = new Array(1, 2, 3);

Above, we show several methods for creating an Array. The first three examples use function notation to create an Array of 0, 3, and 1 objects, respectively. Next, we have an Array of two elements that is created via the bracket notation; notice that the Array contains elements of different types: a string and an int. Lastly, we have three Array objects that are created using constructors: the first creates an Array with 0 elements, the second an Array with three elements, and the third an Array of the three elements 1, 2, and 3.

Filling an Array

  1. var aMyArray:Array = new Array();
    aMyArray.push(80, 120, 200, 440);
  2. var aMyArray:Array = new Array(4);
    aMyArray[0] = 80;
    aMyArray[1] = 120;
    aMyArray[2] = 200;
    aMyArray[3] = 440;

Above, we have two examples of how to declare and fill an Array with the four elements 80, 120, 200, and 400. In the first case, the push() function puts an element, or multiple elements, into an Array and extends the size of the Array. In the second case, we use the typical bracket operator [] to set the value of entries that are already allocated. There are many other functions available for removing elements, concatenating Arrays, and altering Arrays in many other different ways, as well; we will cover those later.

Multi-dimensional Arrays

  1. var aRow1:Array = new Array(1, 2, 3);
    var aRow2:Array = new Array(4, 5, 6);
    var aMyArray:Array = new Array(aRow1, aRow2);
  2. var aRow1:Array = [1, 2, 3];
    var aRow2:Array = [4, 5, 6];
    var aMyArray:Array = [aRow1, aRow2];
  3. var aMyArray:Array = new Array(2);
    aMyArray[0] = new Array(1, 2, 3);
    aMyArray[1] = new Array(4, 5, 6);
  4. var aMyArray:Array = new Array(2);
    aMyArray[0] = [1, 2, 3];
    aMyArray[1] = [4, 5, 6];
  5. var aMyArray:Array = [ [1, 2, 3], [4, 5, 6] ];

Here, we have 5 examples of how to create a two-dimensional Array object, by combining the methods for one-dimensional Arrays. We can continue like this and create Arrays with any number of dimensions.

Creating a Timed Callback Function in Actionscript 3.0

Below, we have an example program, which creates a timer callback function. This program draws a circle that flashes in the middle of the screen at a rate that is specified by the timer that we create. The code sets a timer to call a function that, alternatively, adds and removes a circle from the objects that are to be displayed.

The first three lines of active code initialize the Timer. The first line creates an instance of a Timer that creates a TIMER event every 1000 milliseconds, which equals 1 second. The second line sets the function FlashCircle() to get called every time a TIMER event occurs. The third line starts the Timer so that it generates events every second.

// Create a 1 second timer
var qMyTimer:Timer = new Timer(1000);
qMyTimer.addEventListener(TimerEvent.TIMER, FlashCircle);
qMyTimer.start();

var bDrawCircle:Boolean = true;

// Create a sprite with a circle drawn on it.
var qCircle:Sprite = new Sprite();
var uiColor:uint = 0x00800000;
qCircle.graphics.beginFill(uiColor);
    qCircle.graphics.drawCircle(160, 120, 100);
qCircle.graphics.endFill();

function FlashCircle(e:TimerEvent):void {
    // Add or remove the circle from the stage
    if (bDrawCircle) {
        addChild(qCircle);
    } else {
        removeChild(qCircle);
    }
    // Alternate the drawing
    bDrawCircle = !bDrawCircle;
}

Once the timer is initialized, we have a Boolean, bDrawCircle, that is used to toggle the display of the circle. Below this, we create a Sprite and draw a dark red circle on it. The circle is located at (160, 120) and has a radius of 100.

Finally, we have the callback function FlashCircle(). This function is called every second via a TIMER event. Inside the function, we add or remove the Sprite with the circle drawn on it from the list of items to be displayed. The last line reverses the value of the Boolean, bDrawCircle, to alternate it value between true and false and toggle the drawing of qCircle.

var qMyTimer:Timer = new Timer(1000, 3);

The timer in the program runs continuously. We could set the second argument in the constructor to 3, as shown in the line above. With this constructor call, the timer only runs 3 seconds and generates 3 events. When we don’t specify a second argument, the default value of 0 is used, which sets the timer to run indefinitely.

When we have a finite number of events coming from the timer, we can set an event callback to run when the timer is completely finished. The event TimerEvent.TIMER_COMPLETE can be used instead of TimerEvent.TIMER for a callback that runs when the timer is completely finished.

How to Import an Image to the Library and Display it in Actionscript 3.0

In this post, I demonstrate how to import an image to the library and display it in Actionscript 3.0. Displaying an image that imported to the stage is automatic, but displaying an image that is imported to the library requires creating a class for the image. This is an important step toward using images in programs.

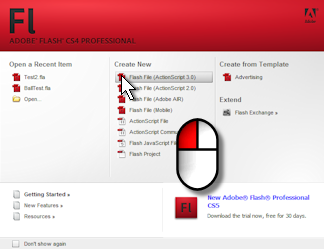
1. Open Flash and create an Actionscript 3.0 project by left-clicking “Flash File (Actionscript 3)” under “Create New” at the start up screen.

2. Next, we want to import an image to the library. To do this, Left-click “File” in the menubar, mouse over “Import” and left-click “Import To Library” in the submenu.

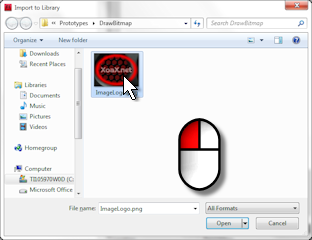
3. Select an image and left-click the “Open” button to import the image.

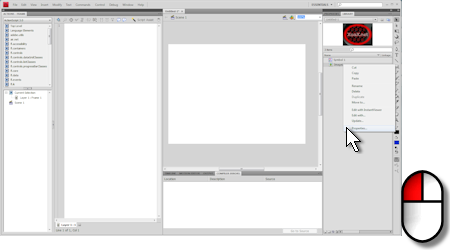
4. Right-click the image in the “Library” pane and left-click “Properties…” to open the “Bitmap Properties” dialog.

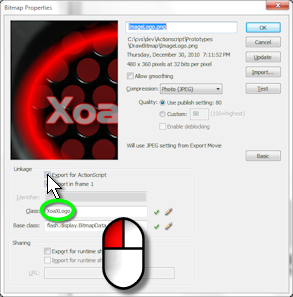
5. Click the box “Export for Actionscript” and we will change the “Class:” to “XoaXLogo” in this case, but you can use whatever name is appropriate. Finally, left-click the “OK” button.

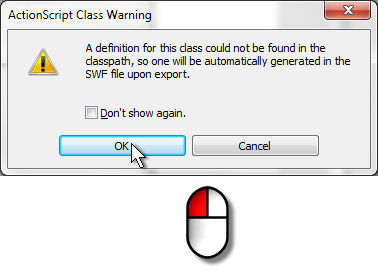
6. Now you will see this warning dialog. Left-click the “OK” button in the dialog to create the new class.

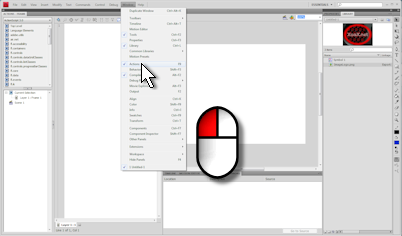
7. Make sure that the “Actions” pane open by left-clicking “Window” in the menubar and left-clicking “Actions” in the submenu if it is not checked.

addChild(new Bitmap(new XoaXLogo(480, 360)));

8. Add the line of code above to the “Actions” Pane. Here, the “Actions” pane is shown docked in the left of the window.

9. Then left-click “Control” and “Test Movie” in the submenu to run the program and you should see you image displayed, just as we showed at the top of this post.

10. The line of code that we added creates an instance of our image class ”XoaXLogo’ with the same size as our original image and stores that in a Bitmap class instance, which we add to the stage via a call to addChild(). Displayable objects that are added to the stage are automatically displayed.

11. At this point, the project is not saved. To save it, select “File” and “Save As…” in the submenu. Then find a location, enter the a filename into the “File name:” box, like “DrawBitmap.fla” and left-click the “Save” button to save the .fla file.


© 2007–2024 XoaX.net LLC. All rights reserved.