Bits & Bytes

Posts Tagged ‘function’

Using C# Delegates to Call Static and Instance Functions

A delegate allows a programmer to abstract functions as variable values in the same way that he abstracts other data, such as integers and doubles, as variable values. Simply put, a delegate is a variable type that defines a specific type of function. An instance of the delegate can hold a reference to any function of that type.

Basic Steps for Using Delegates

  1. Declare a delegate type
  2. Create an instance of the type
  3. Assign that instance to a function
  4. Call the function via the delegate

The essential steps for using a delegate are listed above and demonstrated in the program below. The program consists of two files: Program.cs and CMyDelegateTester.cs–the additional class file is only needed for the second example.

For the first example, we can layout the steps very easily. First, we have the delegate declaration just above the Main() function, which designates our delegate type, DDoSomething. Next, we have the instantiation, pfnFunction, of the delegate type right after the first comment inside the Main() function. This instance is assigned to the static Square() function in the same line. Finally, we call the Square() function via the delegate in the next line with the value 3.0 and output the result.

In the second example, we do the same thing with an instance function of the CMyDelegateTester class. Notice that we need to instantiate the class and that we assign the function, along with its object, to the delegate. This is important because the delegate is attached to and will depend on the object in this case.

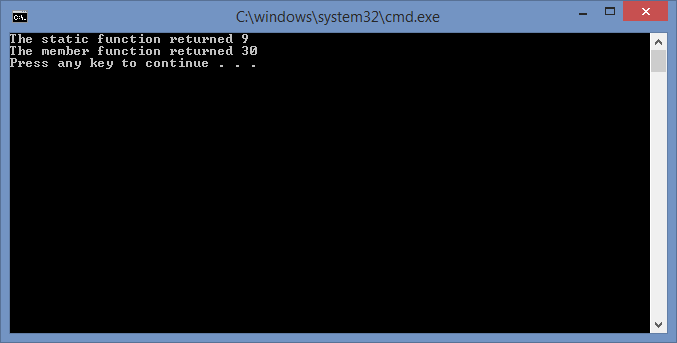
Executing the program, we see the output for each function call:

UsingDelegates

Program.cs

using System;

namespace UsingDelegates {
    class Program {

        delegate double DDoSomething(double dX);

        static void Main(string[] args) {

            // 1. An example using a static function
            DDoSomething pfnFunction = Square;
            Console.WriteLine("The static function returned " + pfnFunction(3.0));

            // 2. An example using a member function
            CMyDelegateTester qTesterObject = new CMyDelegateTester();
            DDoSomething mpfnMemberFunction = qTesterObject.MultiplyByTen;
            Console.WriteLine("The member function returned " + mpfnMemberFunction(3.0));
        }

        static double Square(double dX) {
            return dX * dX;
        }
    }
}

CMyDelegateTester.cs

namespace UsingDelegates {
    public class CMyDelegateTester {

        public CMyDelegateTester() {
        }

        public double MultiplyByTen(double dX) {
            return 10.0 * dX;
        }
    }
}

C# Delegates Versus C++ Function Pointers

A C# delegate is similar to a C++ function pointer. However, there are some subtle differences:

  1. C# delegates require the creation of a new data type. In fact, a delegate declaration is equivalent to a C++ typedef declaration of a function pointer type. While C++ does not require a new type definition to use function pointers, it is good practice.
  2. Like C++ function pointers, C# delegate types are detemined by the arguments and the return value. However, C++ distinguishes between static and instance functions and does not allow them to be used interchangeably as C# does. This is demonstrated in the C# code above.
  3. A C# delegate with a return type of void may be multicast to call multiple functions with one call. This is odd, but it is used with events and listeners, and will be illustrated in a future C# post.

Arguments and Parameters

The terms argument and parameter are frequently used interchangeably, and there is often confusion about what these two terms mean. Arguments and parameters are two different things, but they are closely related. By definition, an argument is a value or variable that is passed into a function, and a parameter is value or variable that is used inside of a function. For illustration, look at the program below.

#include <iostream>

int Sum(int iP1, int iP2) {
    return iP1 + iP2;
}

int main () {
    int iA1 = 48;
    int iA2 = 24;

    std::cout << Sum(iA1, iA2) << std::endl;

    return 0;
}

The program contains takes in two int values and returns an int that is the sum of them. The two int values that the function takes in are called arguments, while the two values that are used inside the function are called parameters. To clarify this, we have named the variables that we used for the arguments, iA1 and iA2, and the two variables that we used for the parameters, iP1 and iP2. Correspondingly, "iA1, iA2" inside the function call is called the argument list and "int iP1, int iP2" inside the function definition is called the parameter list.

In the example above, the difference between the arguments and paramters is clear. The arguments and parameters refer to totally different memory locations because the arguments are both passed by value. In the program below, we have replaced the variables with the constant literals 48 and 24. In this program, these literals are the arguments.

#include <iostream>

int Sum(int iP1, int iP2) {
	return iP1 + iP2;
}

int main () {

    std::cout << Sum(48, 24) << std::endl;

    return 0;
}

In our last example below, we changed the function a bit; we pass the first argument by reference and use a default argument for the second. So, the arguments are iA and 45. The parameters are still iP1 and iP2. However, the first parameter is only a reference so changing its value changes the value of iA, as we would expect. Passing values by reference is probably one of the sources of confusion between arguments and parameters, but it is easy to understand if we remember that the parameter is only a reference; in fact, we could use any valid C++ data type as a parameter, including pointers, constants, etc.

#include <iostream>

void AddTo(int& iP1, int iP2 = 45) {
    iP1 += iP2;
}

int main () {
	int iA = 16;
	AddTo(iA);
	std::cout << iA << std::endl;

    return 0;
}

Creating a Timed Callback Function in Actionscript 3.0

Below, we have an example program, which creates a timer callback function. This program draws a circle that flashes in the middle of the screen at a rate that is specified by the timer that we create. The code sets a timer to call a function that, alternatively, adds and removes a circle from the objects that are to be displayed.

The first three lines of active code initialize the Timer. The first line creates an instance of a Timer that creates a TIMER event every 1000 milliseconds, which equals 1 second. The second line sets the function FlashCircle() to get called every time a TIMER event occurs. The third line starts the Timer so that it generates events every second.

// Create a 1 second timer
var qMyTimer:Timer = new Timer(1000);
qMyTimer.addEventListener(TimerEvent.TIMER, FlashCircle);
qMyTimer.start();

var bDrawCircle:Boolean = true;

// Create a sprite with a circle drawn on it.
var qCircle:Sprite = new Sprite();
var uiColor:uint = 0x00800000;
qCircle.graphics.beginFill(uiColor);
    qCircle.graphics.drawCircle(160, 120, 100);
qCircle.graphics.endFill();

function FlashCircle(e:TimerEvent):void {
    // Add or remove the circle from the stage
    if (bDrawCircle) {
        addChild(qCircle);
    } else {
        removeChild(qCircle);
    }
    // Alternate the drawing
    bDrawCircle = !bDrawCircle;
}

Once the timer is initialized, we have a Boolean, bDrawCircle, that is used to toggle the display of the circle. Below this, we create a Sprite and draw a dark red circle on it. The circle is located at (160, 120) and has a radius of 100.

Finally, we have the callback function FlashCircle(). This function is called every second via a TIMER event. Inside the function, we add or remove the Sprite with the circle drawn on it from the list of items to be displayed. The last line reverses the value of the Boolean, bDrawCircle, to alternate it value between true and false and toggle the drawing of qCircle.

var qMyTimer:Timer = new Timer(1000, 3);

The timer in the program runs continuously. We could set the second argument in the constructor to 3, as shown in the line above. With this constructor call, the timer only runs 3 seconds and generates 3 events. When we don’t specify a second argument, the default value of 0 is used, which sets the timer to run indefinitely.

When we have a finite number of events coming from the timer, we can set an event callback to run when the timer is completely finished. The event TimerEvent.TIMER_COMPLETE can be used instead of TimerEvent.TIMER for a callback that runs when the timer is completely finished.


© 2007–2024 XoaX.net LLC. All rights reserved.