Bits & Bytes

Archive for the ‘General’ Category

Fixing “The battery is charged to a high capacity”

If you have your laptop plugged in for a while, it will fully charge the battery. If the battery remains fully charged, you will often see this dialog warning you about the dangers to the battery if it remains fully charged or nearly so:

To fix this issue and stop battery from being degraded, move the mouse pointer to the lower-right corner of the screen and left-click the arrow next the battery. Then left-click the Energy Manager icon shown here:

This will open the Energy Manager dialog shown here:

Left-click the circle to the upper-right of the gauge to expand the Energy Manager as shown:

Left-click the Settings tab in the expansion to see the settings:

Then left-click the button next to Conservation Mode so that it turns red as shown:

This will keep the battery charge between 20% and 60% and will prevent the battery from being over-charged.

Fixing Disappearing Icon Overlays

Icon overlays are important for visually keeping track of the state of files in a repository. At a glance, you can tell if the file checked in, modified, locked, etc. Below is a screen of some folders that are under version control in TortoiseSVN. The little green check indicates that these folders and the files inside are all checked in and have not been modified since the check in.

The problem is that most versions of Windows have a limited number of available icon overlays that they can use at one time, usually 15 or less. If you use a version control system, like TortoiseSVN, it may register many icon overlays. TortoiseSVN, for example, registers 9 icon overlays. OneDrive uses 5 icon overlays and Google uses 3.

Once you exceed the limited number of icon overlays in the registry, the additional overlays are not displayed. In the case of TortoiseSVN, none of them were displayed when some of them could not be displayed.


The solution is to prioritize the icons that you want to see and move them up in the list using the Registry Editor. Begin by opening a Command Prompt and entering “regedit” to open the Registry Editor as shown below:

Once you enter “regedit” and hit return, the Registry Editor should open and look similar to what is shown below.

As the status bar at the bottom of the window above shows, you need to navigate to the folder Computer\HKEY_LOCAL_MACHINE\SOFTWARE\Microsoft\Windows\CurrentVersion\Explorer\ShellIconOverlayIdentifiers. Now, you should see the list of the names for your icon overlays displayed in the subfolder, and you probably have move than 15 or so of them.

The names of these folders is not important, except to prioritize which ones get used. So, if you want to move some of them up the list, you can add spaces to the front of the folder name, as shown above for the One Drive icon overlays (Microsoft adds one space automatically). Otherwise, you can remove any spaces from the front of the name, as I did with the Google Drive icon overlays (In an effort to beat Microsoft, Google prepends two spaces to its names.). You can add any other characters that you would like to the names of the folders to organize them and select View->Refresh to see your changes. As I said, the name does not matter.

Alternatively, you can also delete some of these folders, but you should perform an Export first, just in case you want to be able to Import them back at a later time. Once you are done, you can close the Command Prompt and Registry Editor windows and restart your machine. The icon overlays should show up after you restart.

Fixing an Empty Battery Indicator in Windows

empty_battery

Shortly after accidentally dumping water on my computer and letting it dry out, it developed an odd error where the battery always indicated that it was empty even when it was fully charged. I searched unsuccessfully for a fix before finding a simple one of my own. This worked on a Windows 8.1 machine, but a similar fix will probably work on any version of Windows.

  1. Start by opening up the Control Panel
    1. Slide the cursor into the upper-right corner and bring it down along the right edge to open the side menu
    2. In the side menu, left-click Settings to open the right-side Settings menu.
    3. In the Settings menu, left-click Control Panel to open the Control Panel window shown below.

    control_panel

  2. Open the Device Manager
    1. Left-click Hardware and Sound (see above) in the Control Panel to open it.
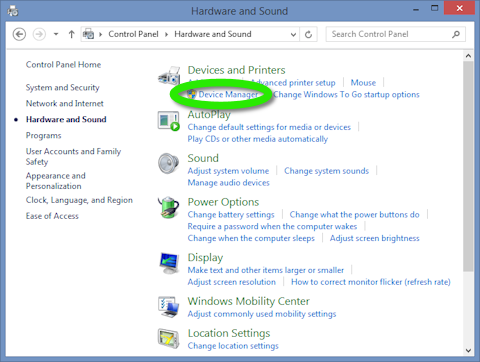
    2. Left-click Device Manager in the Hardware and Sound window (below) under Devices and Printers.

    HardwareAndSound

  3. Uninstall all of the drivers under Batteries
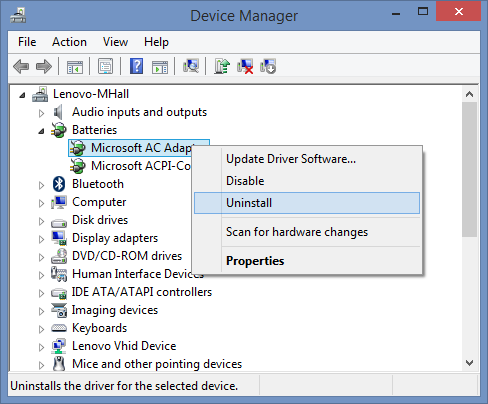
    1. In the Device Manager and under Batteries, right-click a driver to open the context menu, as show below and left-click Uninstall
      uninstall_first
    2. A dialog like the one below may pop up. Left-click the OK button to confirm the uninstall.
      confirm
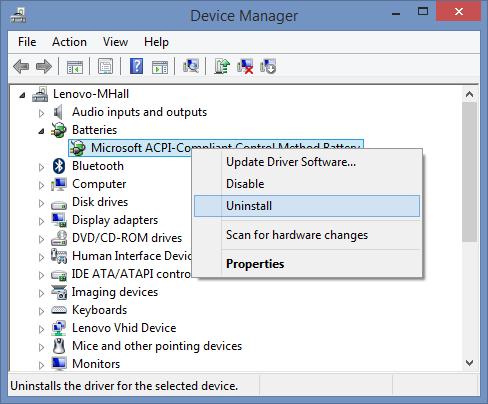
    3. Repeat those steps for each driver.
      uninstall_second
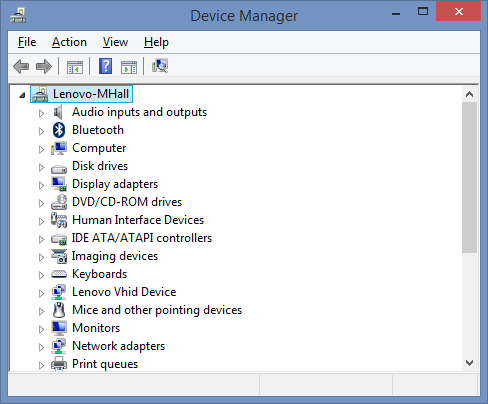
    4. When you are finished, the category for Batteries will be gone.
      device_manager
  4. Right-click the main computer icon to open the context menu shown below, and left-click Scan for hardware changes, as show below. This will replace the drivers. However, you may need to restart the computer to reset the battery indicator.
    scan


© 2007–2024 XoaX.net LLC. All rights reserved.