Bits & Bytes

Posts Tagged ‘sound’

Graphing Sound Data Visualizations in Actionscript 3.0

This program demonstrates how to retrieve and graph a set of samples of sound data. To see the program run, left-click the box above.

The code begins with three lines to output the click instructions. The next three lines create a Sound object, load an mp3 file, and set a callback for when the sound finishes playing. Then we create a ByteArray to store the sound data and set the StartSound() function as a callback for left-clicks.

The rest of the code consists of functions. The StartSound() function begins playing the sound and sets the callback function StartFrame() to get called for every frame of the animation. The SoundFinished() function stops StartFrame() from receiving messages after the sound is finished playing.

The function StartFrame() retrieves the sound data and graphs it. It begins with a call to the static function computeSpectrum() that returns 512 sound samples, 256 for each channel, in the ByteArray qSignal. Next, it clears the old graphics and sets the line style to a green line of width 1 pixel, and calls DrawSignal() twice, once for each channel.

Finally, the DrawSignal() function graphs each of the 256 sound samples. The graph is centered at the y-value dCenterY and the amplitude is scaled by 50 pixels. The scaling means that the samples, which range between -1 and 1, are scaled to the range -50 to 50. We begin each graph with a call to moveTo() so that no line is written from the previous position.

// Output the initial instructions to user
var qInstructions:TextField = new TextField();
qInstructions.text = "Click To Play";
addChild(qInstructions);

var qSound:Sound = new Sound(); 
qSound.load(new URLRequest("http://www.xoax.net/public/XoaXDotNet.mp3"));
qSound.addEventListener(Event.SOUND_COMPLETE, SoundFinished);

var qSignal:ByteArray = new ByteArray();

stage.addEventListener(MouseEvent.CLICK, StartSound);

function StartSound(e:Event):void {
	var qSoundChannel:SoundChannel = qSound.play();
	addEventListener(Event.ENTER_FRAME, StartFrame);
}

function SoundFinished(e:Event):void { 
	removeEventListener(Event.ENTER_FRAME, StartFrame); 
}

function StartFrame(e:Event):void {
	// Get the data for the left and right channels
	SoundMixer.computeSpectrum(qSignal, false, 0);
	graphics.clear();
	graphics.lineStyle(1, 0x00FF00);
	// Graph the left channel on the top
	DrawSignal(50);
	// Graph the right channel on the bottom
	DrawSignal(150);
}

function DrawSignal(dCenterY:Number):void {
	graphics.moveTo(0, dCenterY + 50*qSignal.readFloat());
	for (var i:int = 1; i < 256; i++) { 
		graphics.lineTo(i, dCenterY + 50*qSignal.readFloat()); 
	}
}

Loading and Playing a Sound File in Actionscript 3.0

This program loads an mp3 file and plays it. The entire program is given below and the compiled SWF is shown above. To hear the file play, left-click the window above.

The code begins with three lines that tell the user to click the screen. Then we create a String for the URL, which could also be a local file. Next, we set our function as the callback for mouse clicks. Inside the function OnClick(), we create a Sound object, load the sound file, and then play it.

// Output the initial instructions to user
var qInstructions:TextField = new TextField();
qInstructions.text = "Click To Play";
addChild(qInstructions);

const ksXoaXDotNet:String = "http://www.xoax.net/public/XoaXDotNet.mp3";

// Play the mp3 when the screen is clicked
stage.addEventListener(MouseEvent.CLICK, OnClick);

function OnClick(e:MouseEvent): void {
	var qSound:Sound = new Sound();
	qSound.load(new URLRequest(ksXoaXDotNet));
	qSound.play();
}

Looping Music or Sounds in Actionscript 3.0

For the second example, we demonstrate how to loop a music file using a separate class file. We start with the sound file “XoaxTheme.mp3” in our project and its associated class, XoaxTheme, that we had from our previous post.

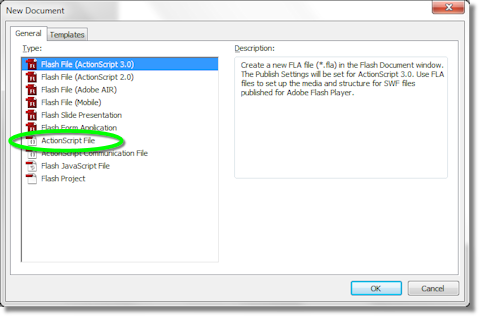
To begin, we add an ActionScript code file to the project by selecting File->New from the menubar. This opens the “New Document” dialog shown below, where we left-click “ActionScript File” to select it and left-click the “OK” button to create a new code file.

Next, we paste this code into the new file:

package {

    import flash.media.SoundChannel;
    import flash.events.Event;
	
    public class CMyClass {
		
        var mqMusic:XoaxTheme;
        var mqSoundChannel:SoundChannel;

        public function CMyClass() {
            mqMusic = new XoaxTheme();
        }
		
        public function StartMusic(e:Event):void {
            mqSoundChannel = mqMusic.play();
            mqSoundChannel.addEventListener(Event.SOUND_COMPLETE,
                StartMusic);
        }
    }
}

and then change the code in the main code file to this:

var qMyClass:CMyClass = new CMyClass();
qMyClass.StartMusic(null);

The new code file needs to be saved. So, we select File->Save As… from the menubar and save the file as “CMyClass.as” in the project folder. Finally, we can compile and execute the code, and it will play the music repeatedly.

Let’s review the code above. In our class file, we use an unnamed package and import the SoundChannel and Event files. Inside the class, we have two members: mqMusic and mqSoundChannel, which are used to control the music. The class XoaxTheme is the sound class that we created in the library. We instantiate this class in the constructor.

The function StartMusic() does all of the real work in the program. When we call play(), the music starts playing and a SoundChannel object is created and returned. The SoundChannel controls the sound as it plays. We register a SOUND_COMPLETE event on the SoundChannel to call the function StartMusic() recursively when the music finishes playing. In this manner, we create the loop for repeatedly playing the music.

In the main program, we create an instance of a CMyClass object and then call StartMusic() on it to begin the music loop.


© 2007–2024 XoaX.net LLC. All rights reserved.