The Demonstration
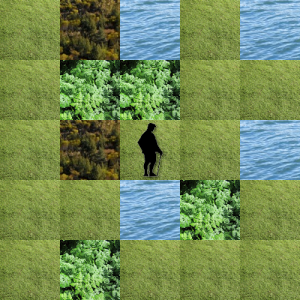
This post demonstrates how to program the basic elements of a 2D tiled game with terrain images. This is an update to my prior post with terrain images added, along with an image for our game character. You can try out the demo, by left-clicking this link and then using the arrow keys to move around.
The Code
Most of this code was explained already in my prior post; so, I will explain the minor changes that have been made, beginning with the HTML file. In the HTML file, I have changed the 25 div elements to img elements so that they can hold images. I have also added an additional img element to hold the character image at the end of the background div.
Inside the JavaScript File, I have added variables to hold the terrain images and adapted the functions to use these images. At the top of the file, there are four new variables declared to hold the images for the terrain types: grass, forest, water, and bushes. In the Initialize() function, we allocate and set these terrain image variables. The function GetRandomTerrain() has been changed from the prior GetRandomColor() function to return an image object rather than a color. The FillBoard() function has been changed from the prior ColorBoard() function so that it now returns a null image for squares outside of the map; this has the effect of leaving these squares medium gray, as defined by the background element. The rest of the changes consist of calling these to functions instead of the prior functions. So, the changes are simple and straightforward.
Again, the HTML code can be put into any file with a .html extension, but the JavaScript file should be named “XoaXGameTerrain2D.js” in order to work with the code as is. Also, you will need 100 pixel by 100 pixel terrain images and a character image, which should be stored in the same folder with the HTML and JavaScript files.
HTML File
<!DOCTYPE html PUBLIC "-//W3C//DTD XHTML 1.0 Transitional//EN"

"http://www.w3.org/TR/xhtml1/DTD/xhtml1-transitional.dtd">
<html xmlns="http://www.w3.org/1999/xhtml" xml:lang="en" lang="en">
<head>
<title>XoaX.net's Javascript 2D Game Board Example</title>
<script type="text/javascript" src="XoaXGameTerrain2D.js"></script>
</head>
<body>
<div id="gameboard" style="position:absolute; width:500px; height:500px; background:#aaaaaa; margin:30px;">
<img id="A11" style="left:0px; top:0px; position:absolute; width:100px; height:100px;" />
<img id="A12" style="left:100px; top:0px; position:absolute; width:100px; height:100px;" />
<img id="A13" style="left:200px; top:0px; position:absolute; width:100px; height:100px;" />
<img id="A14" style="left:300px; top:0px; position:absolute; width:100px; height:100px;" />
<img id="A15" style="left:400px; top:0px; position:absolute; width:100px; height:100px;" />
<img id="A21" style="left:0px; top:100px; position:absolute; width:100px; height:100px;" />
<img id="A22" style="left:100px; top:100px; position:absolute; width:100px; height:100px;" />
<img id="A23" style="left:200px; top:100px; position:absolute; width:100px; height:100px;" />
<img id="A24" style="left:300px; top:100px; position:absolute; width:100px; height:100px;" />
<img id="A25" style="left:400px; top:100px; position:absolute; width:100px; height:100px;" />
<img id="A31" style="left:0px; top:200px; position:absolute; width:100px; height:100px;" />
<img id="A32" style="left:100px; top:200px; position:absolute; width:100px; height:100px;" />
<img id="A33" style="left:200px; top:200px; position:absolute; width:100px; height:100px;" />
<img id="A34" style="left:300px; top:200px; position:absolute; width:100px; height:100px;" />
<img id="A35" style="left:400px; top:200px; position:absolute; width:100px; height:100px;" />
<img id="A41" style="left:0px; top:300px; position:absolute; width:100px; height:100px;" />
<img id="A42" style="left:100px; top:300px; position:absolute; width:100px; height:100px;" />
<img id="A43" style="left:200px; top:300px; position:absolute; width:100px; height:100px;" />
<img id="A44" style="left:300px; top:300px; position:absolute; width:100px; height:100px;" />
<img id="A45" style="left:400px; top:300px; position:absolute; width:100px; height:100px;" />
<img id="A51" style="left:0px; top:400px; position:absolute; width:100px; height:100px;" />
<img id="A52" style="left:100px; top:400px; position:absolute; width:100px; height:100px;" />
<img id="A53" style="left:200px; top:400px; position:absolute; width:100px; height:100px;" />
<img id="A54" style="left:300px; top:400px; position:absolute; width:100px; height:100px;" />
<img id="A55" style="left:400px; top:400px; position:absolute; width:100px; height:100px;" />
<img src="Man.png" style="left:200px; top:200px; position:absolute; width:100px; height:100px;" />
</div>
</body>
</html>
JavaScript File
var qpBkdg = null;

var qppBoard = null;

var qppMap = null;

var iLocX = 10;

var iLocY = 10;

var qpGrass = null;

var qpForest = null;

var qpWater = null;

var qpBushes = null;
function KeyHandler(qKeyEvent) {
var iKeyDown = 0;
var iLeftArrow = 37;
var iUpArrow = 38;
var iRightArrow = 39;
var iDownArrow = 40;
if (qKeyEvent) {
iKeyDown = qKeyEvent.which;
} else {
iKeyDown = window.event.keyCode;
}
if (iKeyDown === iLeftArrow) {
if (iLocX > 0) {
iLocX = iLocX - 1;
}
} else if (iKeyDown === iRightArrow) {
if (iLocX < 19) {
iLocX = iLocX + 1;
}
} else if (iKeyDown === iUpArrow) {
if (iLocY > 0) {
iLocY = iLocY - 1;
}
} else if (iKeyDown === iDownArrow) {
if (iLocY < 19) {
iLocY = iLocY + 1;
}
}
FillBoard();
return false;
}
function GetRandomTerrain() {
var iRnd = Math.floor(Math.random()*10);
switch(iRnd) {
case 0:
{
return qpWater;
}
case 1:
{
return qpForest;
}
case 2:
{
return qpBushes;
}
default:
{
return qpGrass;
}
}
}
function FillBoard() {
for (var iY = iLocY - 2; iY < iLocY + 3; iY++) {
for (var iX = iLocX - 2; iX < iLocX + 3; iX++) {
if (iY < 0 || iX < 0 || iY > 19 || iX > 19) {
qppBoard[iY - iLocY + 2][iX - iLocX + 2].src = null;
} else {
qppBoard[iY - iLocY + 2][iX - iLocX + 2].src = qppMap[iY][iX].src;
}
}
}
}
function Initialize() {
qpGrass = new Image();
qpGrass.src = "Grass.png"
qpForest = new Image();
qpForest.src = "Forest.png"
qpWater = new Image();
qpWater.src = "Water.png"
qpBushes = new Image();
qpBushes.src = "Bushes.png"
// Generate map
qppMap = new Array(20);
for (var iY = 0; iY < 20; iY++) {
qppMap[iY] = new Array(20);
for (var iX = 0; iX < 20; iX++) {
qppMap[iY][iX] = GetRandomTerrain();
}
}
// Allocate the visible board
qppBoard = new Array(5);
for (var iY = 0; iY < 5; iY++) {
qppBoard[iY] = new Array(5);
for (var iX = 0; iX < 5; iX++) {
qppBoard[iY][iX] = document.getElementById('A'+((iY+1)*10+(iX+1)));
}
}
FillBoard();
document.onkeydown = KeyHandler;
qpBkdg = document.getElementById('gameboard');
}
window.onload = Initialize;

 RSS
RSS Atom
Atom Feedburner
