Bits & Bytes

Posts Tagged ‘code’

Looping Music or Sounds in Actionscript 3.0

For the second example, we demonstrate how to loop a music file using a separate class file. We start with the sound file “XoaxTheme.mp3” in our project and its associated class, XoaxTheme, that we had from our previous post.

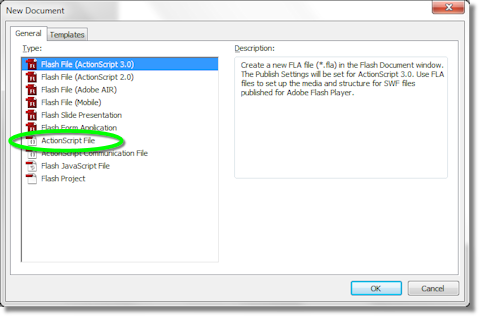
To begin, we add an ActionScript code file to the project by selecting File->New from the menubar. This opens the “New Document” dialog shown below, where we left-click “ActionScript File” to select it and left-click the “OK” button to create a new code file.

Next, we paste this code into the new file:

package {

    import flash.media.SoundChannel;
    import flash.events.Event;
	
    public class CMyClass {
		
        var mqMusic:XoaxTheme;
        var mqSoundChannel:SoundChannel;

        public function CMyClass() {
            mqMusic = new XoaxTheme();
        }
		
        public function StartMusic(e:Event):void {
            mqSoundChannel = mqMusic.play();
            mqSoundChannel.addEventListener(Event.SOUND_COMPLETE,
                StartMusic);
        }
    }
}

and then change the code in the main code file to this:

var qMyClass:CMyClass = new CMyClass();
qMyClass.StartMusic(null);

The new code file needs to be saved. So, we select File->Save As… from the menubar and save the file as “CMyClass.as” in the project folder. Finally, we can compile and execute the code, and it will play the music repeatedly.

Let’s review the code above. In our class file, we use an unnamed package and import the SoundChannel and Event files. Inside the class, we have two members: mqMusic and mqSoundChannel, which are used to control the music. The class XoaxTheme is the sound class that we created in the library. We instantiate this class in the constructor.

The function StartMusic() does all of the real work in the program. When we call play(), the music starts playing and a SoundChannel object is created and returned. The SoundChannel controls the sound as it plays. We register a SOUND_COMPLETE event on the SoundChannel to call the function StartMusic() recursively when the music finishes playing. In this manner, we create the loop for repeatedly playing the music.

In the main program, we create an instance of a CMyClass object and then call StartMusic() on it to begin the music loop.

Creating a 3D Animation in Actionscript 3.0

In this example, I create a 3D box with a ball bouncing around inside it. To do this, I create an animation using the ENTER_FRAME event that I used in the previous animation. The entire program is below at the end of this post.

The first line of code sets the callback for each frame of animation via a call to addEventListener() with ENTER_FRAME as the event and the function NextFrame() as the callback. After this, we use the stage’s graphics object to paint the entire screen black; this will be the background.

The next four sections of code each draw a rectangle in various shades of red and rotate them to make them to be perpendicular to the view. These are the four sides of our box. They are assigned a z-value of 25 to move them slightly away from the view plane at z = 0. Finally, the back to the box is created at z = 325 with a “XoaX.net” logo Bitmap. The dimensions of the box are 320x240x300.

After the walls of the box are created, we have three sets of variables for each dimension of movement for the ball inside the box. After this, we have Bitmap that represents the ball. This ball will be moved around by our animation callback function. Lastly, we have the callback function, which reflects the ball in each coordinate, similar to what we did in the last animation with the x-coordinate. Using these reflections, we get a ball that bounces around the box as we see in window above. Note that the projection is created via the default perspective projection, which we have not discussed yet.

addEventListener(Event.ENTER_FRAME, NextFrame);

// Paint the stage black 
var uiColorBack:uint = 0x00000000;
graphics.beginFill(uiColorBack);
    graphics.drawRect(0, 0, 320, 240);
graphics.endFill();

// Top
// Create rect for sprite and add to stage
var qTop:Sprite = new Sprite();
var uiColor:uint = 0x00900000;
qTop.graphics.beginFill(uiColor);
    qTop.graphics.drawRect(0, 0, 320, 300);
qTop.graphics.endFill();
qTop.rotationX = 90;
qTop.z = 25;
addChild(qTop);

// Left
var qLeft:Sprite = new Sprite();
var uiColor2:uint = 0x00B00000;
qLeft.graphics.beginFill(uiColor2);
    qLeft.graphics.drawRect(0, 0, 300, 240);
qLeft.graphics.endFill();
qLeft.rotationY = -90;
qLeft.z = 25;
addChild(qLeft);

// Right
var qRight:Sprite = new Sprite();
var uiColor3:uint = 0x00D00000;
qRight.graphics.beginFill(uiColor3);
    qRight.graphics.drawRect(0, 0, 300, 240);
qRight.graphics.endFill();
qRight.rotationY = -90;
qRight.x = 320;
qRight.z = 25;
addChild(qRight);

// Bottom
var qBottom:Sprite = new Sprite();
var uiColor4:uint = 0x00F00000;
qBottom.graphics.beginFill(uiColor4);
    qBottom.graphics.drawRect(0, 0, 320, 300);
qBottom.graphics.endFill();
qBottom.rotationX = 90;
qBottom.y = 240;
qBottom.z = 25;
addChild(qBottom);

// Back
// Use a logo image to create a bitmap
var qLogo:Bitmap = new Bitmap(new Logo(320, 240), "never", true);
qLogo.z = 325;
addChild(qLogo);

// Variables for motion control
var uiX:uint = 0;
var uiDeltaX:uint = 4;
var kuiMaxX:uint = 260;

var uiY:uint = 0;
var uiDeltaY:uint = 3;
var kuiMaxY:uint = 180;

var uiZ:uint = 0;
var uiDeltaZ:uint = 3;
var kuiMaxZ:uint = 240;

// Use a ball image to create a bitmap
var qBall:Bitmap = new Bitmap(new Ball(60, 60), "never", true);
addChild(qBall);

// Animation callback
function NextFrame(e:Event) : void {
	uiX = ((uiX + uiDeltaX) % (kuiMaxX + 1));
	qBall.x = uiX;
	if (uiX == kuiMaxX || uiX == 0) {
		uiDeltaX = (kuiMaxX - uiDeltaX);
	}
	
	uiY = ((uiY + uiDeltaY) % (kuiMaxY + 1));
	qBall.y = uiY;
	if (uiY == kuiMaxY || uiY == 0) {
		uiDeltaY = (kuiMaxY - uiDeltaY);
	}
	
	uiZ = ((uiZ + uiDeltaZ) % (kuiMaxZ + 1));
	qBall.z = uiZ + 30 + 25;
	if (uiZ == kuiMaxZ || uiZ == 0) {
		uiDeltaZ = (kuiMaxZ - uiDeltaZ);
	}
}
 

© 2007–2024 XoaX.net LLC. All rights reserved.