
Core Development
How to Install PHP for IIS
This computer development video tutorial demonstrates how to install the PHP language to run on Microsoft's Internet Information Services web server.
- First, you must have IIS installed. If you do not have it installed, you can install it by following the steps in our prior video on installing IIS.
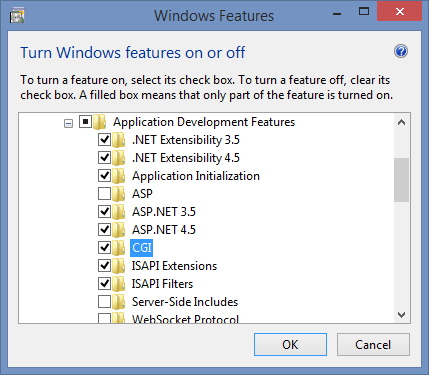
- To begin, we need to install CGI. To do this, move the cursor to the upper-right corner of the screen and pull it down along the edge to open the side menu. Left-click the Search icon in the side menu to open the Search box in the side menu. Inside the search box, enter "Turn Windows features on or off" and left-click the icon underneath it to open the Windows Features dialog.
- Inside the dialog, find Internet Information Services->World Wide Web Services->Application Development Features->CGI and left-click the empty box next it to select it for installation, and left-click the OK button to begin the installation.
- Now you should see a progress dialog that says "Searching for required files." After a brief time, the message will change to "Applying changes" and should look that way for a while. When it is done, you will see this message saying, "Windows completed the requested changes." Left-click the "Close" button.
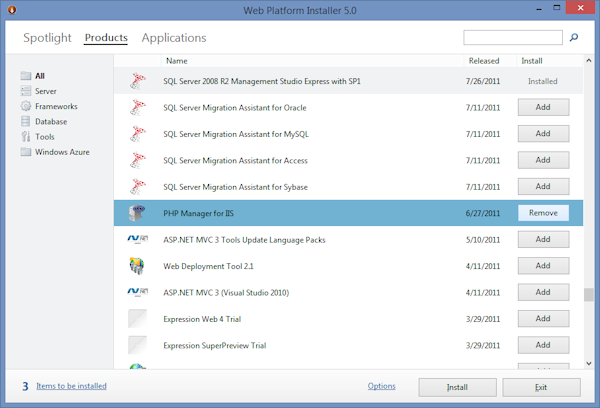
- Again, open the side Search box in the side menu and enter "Web Platform Installer" into it and right-click the icon for the Microsoft Web Platform Installer. Then left-click Run as administrator in the context menu.
- You might get a User Account Control warning message box asking you if you want to allow the application to run. If you do, left-click the "Yes" button to go on. Now the Web Platfom Installer should be open and look like this.
- In the Web Platfom Installer, left-click the "Products" link at the top of the window. Scroll down to find the latest version of PHP and left-click the "Add" button to select it for installation. Then scroll to find "PHP Manager for IIS" and left-click its "Add" button to select it. To begin the installation, left-click the "Install" button.
- This will bring up the "license agreement." To accept it, left-click the "I Accept" button. This will begin the installation, which will run for a while. When the installation is complete, left-click the "Finish" button and close the Web Platform Installer dialog by left-clicking the "Exit" button.
- For the next step, we will create an example PHP code file. To do this, open the folder where you want to put your PHP code; In my example, I put it in the root directory. Right-click to open the context menu, mouse over "New", and left-click "Folder" to create a new folder. Name the folder "TestPHP" for clarity. Next, left-click the folder to go into it and see that it is empty.
- At this point, we want to create our PHP file. We can use any text editor for this, like Notepad. You can open Notepad by left-clicking the icon in the Start menu. To create our PHP file, enter this text into the window:
<?php phpinfo(); ?>
Then left-click "File" in the menubar and left-click "Save As..." in the submenu. This opens the "Save As" dialog as shown here. Navigate to the folder that you just created and enter "phpinfo.php" in the box next to "File name:". Then left-click the "Save" button. That saves the file to your folder. So, you can close Notepad and now you should see you file in the folder that you created. - Now we want to open the IIS Manager and enable IIS on our new folder. Open the search box as we did before, and enter "IIS Manager" into it and left-click the icon below it to open the IIS Manager. If you see a message box, just left-click the "No" button to close it.
- Now you should have the IIS Manager open like this. Left-click to expand the list in the left-hand pane so that you can see "Sites" in it. Left-click the word "Sites" to select it. In the center pane, left-click "Default Web Site" or any other site that might be running on port 80. Then left-click "Stop" under Manage Website and verify that the site is stopped under status.
- Right-click "Sites" and left-click "Add Website..." in the left-hand pane to open the "Add Website" dialog. Now enter "PHP Testing" into the box under "Site name:" and then enter the path for your new folder in the box under "Physical path:". Finish by left-clicking the "OK" button. This might bring up a message box. Left-click "Yes" to continue. Now you should see the site added and started.
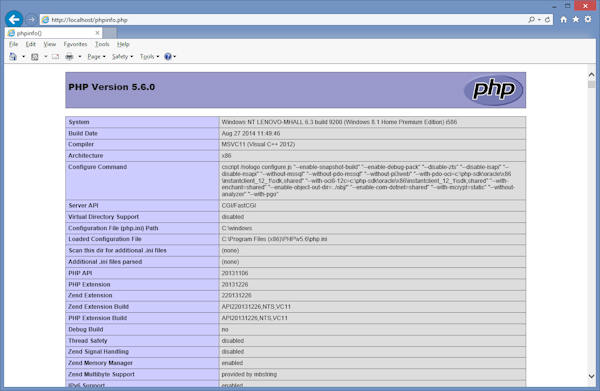
- To see the page run, open a browser and enter http://localhost/phpinfo.php into the address bar and you should see the PHP information page shown here.
© 2007–2026 XoaX.net LLC. All rights reserved.