Bits & Bytes

Posts Tagged ‘graphics’

Rendering Transparent 3D Surfaces in WPF with C#

The primary problems that arise when rendering semi-transparent 3d objects in Windows Presentation Foundation have to do with false z-buffer occlusions. Specifically, when a transparent surface or polygon is rendered, it sets the z-buffer depth values to block objects that are behind it from being rendered, even though they should show through the transparent layer.

In WPF with C#, the z-buffer is not accessible. So, it can not be disabled during transparent rendering. Instead, we must render the transparent objects last so that they are layered over the rest of the scene and the objects behind them show through.

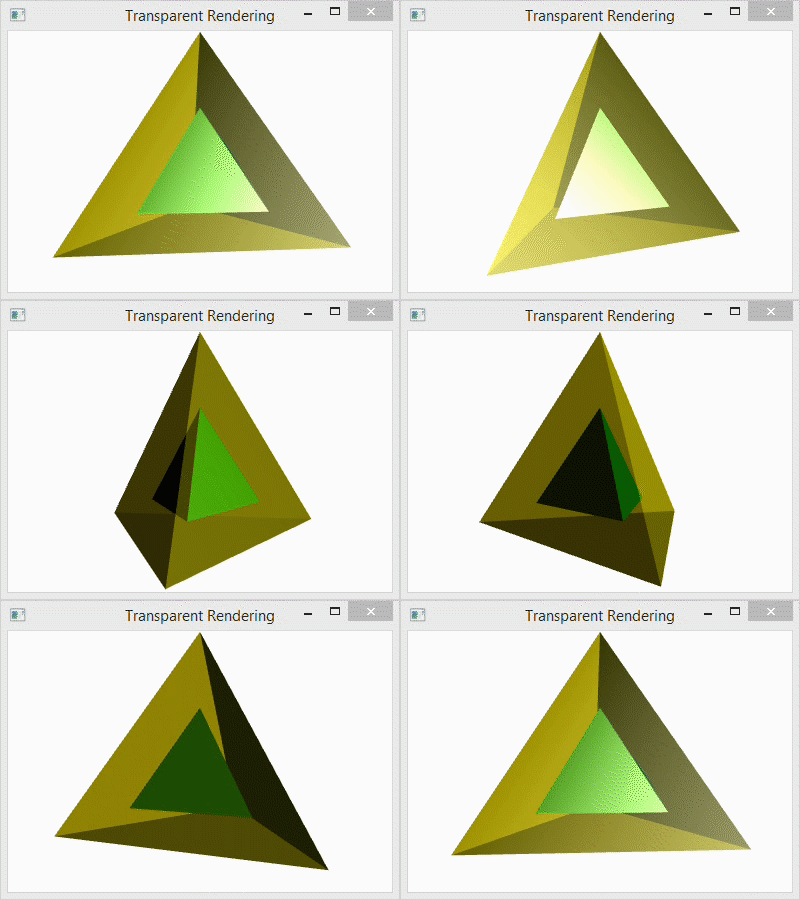
RotatingTransTetra

Below, I have a program for the single code file that I used to generate the spinning, transparent tetrahedron shown above. The C# project that I used is a simple Console Application project with the libraries PresentationCore, PresentationFramework, and WindowsBase references added to it as I showed in a prior post: Using WPF in a C# Console Application. The Main() function creates the Window for the program and calls TransparentScene() to do all of the rendering.

Inside the function TransparentScene(), I create the camera, the light, the animated rotation transformation, the tetrahedron geometry, and then use that geometry to specify three tetrahedrons. The first tetrahedron is called the Inner Tetrahedron because it is scaled to fit inside the others. The second tetrahedron is called the Outer Tetrahedron and is semi-transparent. The third tetrahedron is also part of the Outer Tetrahedron, but consists of the opaque back faces. Note that it only makes sense to render the back faces because the front faces are semi-transparent. Otherwise, the back would not be visible.

At the end the code, I use the following lines to add the tetrahedrons to the scene:

            qModelGroup.Children.Add(qBackGeometry);
            qModelGroup.Children.Add(qInnerGeometry);
            qModelGroup.Children.Add(qOuterGeometry);

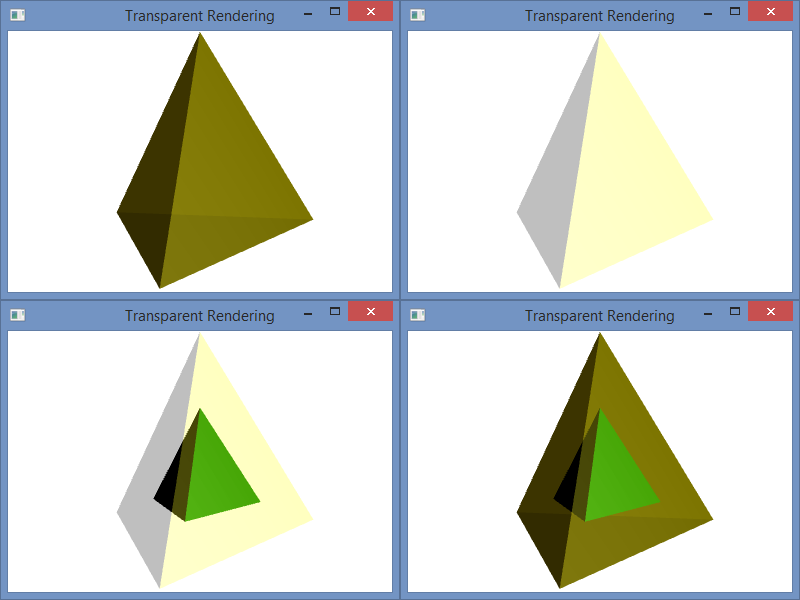
Notice that the transparent “Outer Geometry” layer is added last. This is necessary to avoid false occlusions.

For comparison, I have included the image below with four different arrangements. The first (top-left) shows the scene with the transparent outer layer added before the inner and after the back. The second (top-right) shows the transparent outer layer added before both the inner and the back layers. The third (bottom-left) shows the transparent layer added before the back and after the inner layer. The last (bottom-right) shows the scene with the transparent layer added last as it is in the code.

TransparentComparison

Program.cs

using System;
using System.Windows;
using System.Windows.Controls;
using System.Windows.Media;
using System.Windows.Media.Media3D;
using System.Windows.Media.Animation;

namespace WpfTransparent {
    class Program {
        [STAThread]
        static void Main(string[] args) {
            Window qWindow = new Window();
            qWindow.Title = "Transparent Rendering";
            qWindow.Width = 400;
            qWindow.Height = 300;
            qWindow.Content = TransparentScene();
            qWindow.ShowDialog();
        }

        static Viewport3D TransparentScene() {
            // Define the camera
            PerspectiveCamera qCamera = new PerspectiveCamera();
            qCamera.Position = new Point3D(0, .25, 2.25);
            qCamera.LookDirection = new Vector3D(0, -.05, -1);
            qCamera.UpDirection = new Vector3D(0, 1, 0);
            qCamera.FieldOfView = 60;

            // Define a lighting model
            DirectionalLight qLight = new DirectionalLight();
            qLight.Color = Colors.White;
            qLight.Direction = new Vector3D(-0.5, -0.25, -0.5);

            // Define the animated rotation transformation
            RotateTransform3D qRotation =
                new RotateTransform3D(new AxisAngleRotation3D(new Vector3D(0, 1, 0), 1));
            DoubleAnimation qAnimation = new DoubleAnimation();
            qAnimation.From = 1;
            qAnimation.To = 361;
            qAnimation.Duration = new Duration(TimeSpan.FromMilliseconds(5000));
            qAnimation.RepeatBehavior = RepeatBehavior.Forever;
            qRotation.Rotation.BeginAnimation(AxisAngleRotation3D.AngleProperty, qAnimation);

            // Define the geometry
            const double kdSqrt2 = 1.4142135623730950488016887242097;
            const double kdSqrt6 = 2.4494897427831780981972840747059;
            // Create a collection of vertex positions
            Point3D[] qaV = new Point3D[4]{
                new Point3D(0.0, 1.0, 0.0),
                new Point3D(2.0 * kdSqrt2 / 3.0, -1.0 / 3.0, 0.0),
                new Point3D(-kdSqrt2 / 3.0, -1.0 / 3.0, -kdSqrt6 / 3.0),
                new Point3D(-kdSqrt2 / 3.0, -1.0 / 3.0, kdSqrt6 / 3.0)};
            Point3DCollection qPoints = new Point3DCollection();
            // Designate Vertices
            // My Scheme (0, 1, 2), (1, 0, 3), (2, 3, 0), (3, 2, 1)
            for (int i = 0; i < 12; ++i) {
                if ((i/3) % 2 == 0) {
                    qPoints.Add(qaV[i%4]);
                } else { 
                    qPoints.Add(qaV[(i*3)%4]);
                }
            }
            // Designate Triangles
            Int32Collection qTriangles = new Int32Collection();
            for (int i = 0; i < 12; ++i ) {
                qTriangles.Add(i);
            }
            Int32Collection qBackTriangles = new Int32Collection();
            // Designate Back Triangles in the opposite orientation
            for (int i = 0; i < 12; ++i) {
                qBackTriangles.Add(3 * (i / 3) + (2 * (i % 3) % 3));
            }

            // Inner Tetrahedron: Define the mesh, material and transformation.
            MeshGeometry3D qFrontMesh = new MeshGeometry3D();
            qFrontMesh.Positions = qPoints;
            qFrontMesh.TriangleIndices = qTriangles;
            GeometryModel3D qInnerGeometry = new GeometryModel3D();
            qInnerGeometry.Geometry = qFrontMesh;
            // *** Material ***
            DiffuseMaterial qDiffGreen =
                new DiffuseMaterial(new SolidColorBrush(Color.FromArgb(255, 0, 128, 0)));
            SpecularMaterial qSpecWhite = new
                SpecularMaterial(new SolidColorBrush(Color.FromArgb(255, 255, 255, 255)), 30.0);
            MaterialGroup qInnerMaterial = new MaterialGroup();
            qInnerMaterial.Children.Add(qDiffGreen);
            qInnerMaterial.Children.Add(qSpecWhite);
            qInnerGeometry.Material = qInnerMaterial;
            // *** Transformation ***
            ScaleTransform3D qScale = new ScaleTransform3D(new Vector3D(.5, .5, .5));
            Transform3DGroup myTransformGroup = new Transform3DGroup();
            myTransformGroup.Children.Add(qRotation);
            myTransformGroup.Children.Add(qScale);
            qInnerGeometry.Transform = myTransformGroup;

            // Outer Tetrahedron (semi-transparent) : Define the mesh, material and transformation.
            GeometryModel3D qOuterGeometry = new GeometryModel3D();
            qOuterGeometry.Geometry = qFrontMesh;
            // *** Material ***
            DiffuseMaterial qDiffTransYellow =
                new DiffuseMaterial(new SolidColorBrush(Color.FromArgb(64, 255, 255, 0)));
            SpecularMaterial qSpecTransWhite =
                new SpecularMaterial(new SolidColorBrush(Color.FromArgb(128, 255, 255, 255)), 30.0);
            MaterialGroup qOuterMaterial = new MaterialGroup();
            qOuterMaterial.Children.Add(qDiffTransYellow);
            qOuterMaterial.Children.Add(qSpecTransWhite);
            qOuterGeometry.Material = qOuterMaterial;
            // *** Transformation ***
            qOuterGeometry.Transform = qRotation;

            // Outer Tetrahedron (solid back) : Define the mesh, material and transformation.
            MeshGeometry3D qBackMesh = new MeshGeometry3D();
            qBackMesh.Positions = qPoints;
            qBackMesh.TriangleIndices = qBackTriangles;
            GeometryModel3D qBackGeometry = new GeometryModel3D();
            qBackGeometry.Geometry = qBackMesh;
            // *** Material ***
            DiffuseMaterial qDiffBrown =
                new DiffuseMaterial(new SolidColorBrush(Color.FromArgb(255, 200, 175, 0)));
            qBackGeometry.Material = qDiffBrown;
            // *** Transformation ***
            qBackGeometry.Transform = qRotation;

            // Collect the components
            Model3DGroup qModelGroup = new Model3DGroup();
            qModelGroup.Children.Add(qLight);
            qModelGroup.Children.Add(qBackGeometry);
            qModelGroup.Children.Add(qInnerGeometry);
            qModelGroup.Children.Add(qOuterGeometry);
            ModelVisual3D qVisual = new ModelVisual3D();
            qVisual.Content = qModelGroup;
            Viewport3D qViewport = new Viewport3D();
            qViewport.Children.Add(qVisual);
            qViewport.Camera = qCamera;

            return qViewport;
        }
    }
}

Programming a 3D Scene in WPF with C#

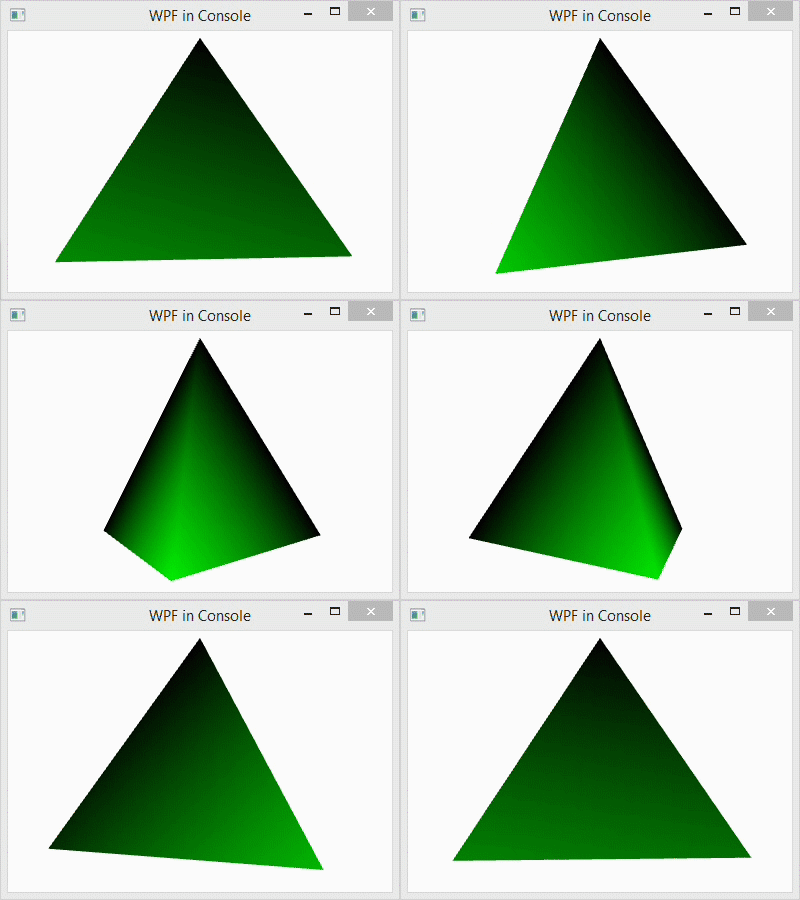
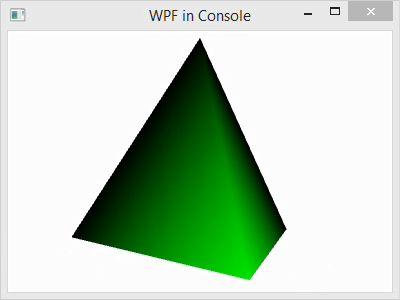
In this post, I explain the basic Windows Presentation Foundation programming elements of a 3D scene in C#. The C# code that I use for demonstration creates a simple tetrahedron model and rotates it around the vertical axis.

RotatingTetra

To create the project, follow these steps:

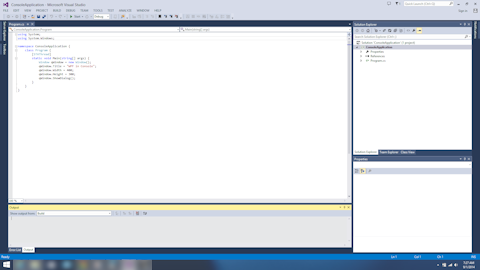
  1. Begin with the project from our prior blog post, or create a new WPF project.
    OpenProject
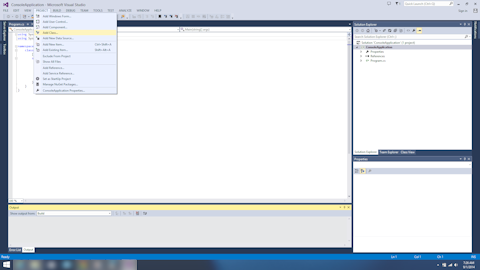
  2. Add a class file to the project: left-click PROJECT in the menubar and left-click Add Class… in the submenu.
    ProjectAddClass
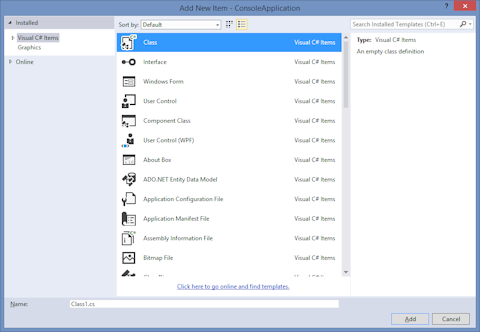
  3. This pops up the Add New Item dialog. Select Installed->Visual C# Items in the left-hand pane.
    VisualCsharpItems
  4. Then left-click Class in the center pane to select it.
    Class
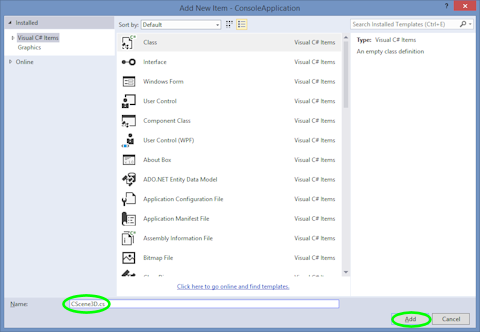
  5. Finally, rename the class by left-clicking the text box next to Name: at the bottom of the window and entering CScene3d.cs. Finish adding the class by left-clicking the Add button.RenameClass
  6. Next, copy the code for “CScene3D.cs” below into the file of the same name in your project.
  7. Finally, finish the code by adding this line to “Program.cs” as shown in the code below to allow the window to display the 3D scene:
    qWindow.Content = TestScenes.Test5();
  8. Compile and execute the program by left-clicking DEBUG in the menubar and left-clicking Start Without Debugging in the submenu. After a few seconds, the code will be compiled and a window will pop up displaying a rotating tetrahedron.DemoImage

The WPF scene creation in “CScene3D.cs” consists of a few basic steps, which can be outlined as follows:


  1. Create a camera and add it.
  2. Create a lighting model and add it.
  3. Create a geometric model and add it
    1. Create points, triangles, and normals
    2. Set the material properties
    3. Create and apply transforms

For simplicity, I have skipped some steps, like adding normals, and accepted default values for much of the rest. At the end, I have collected components to added them appropriately. Pay close attention to that.

Program.cs

using System;
using System.Windows;

namespace ConsoleApplication {
    class Program {
        [STAThread]
        static void Main(string[] args) {
            Window qWindow = new Window();
            qWindow.Title = "WPF in Console";
            qWindow.Width = 400;
            qWindow.Height = 300;
            qWindow.Content = CScene3D.Test();
            qWindow.ShowDialog();
        }
    }
}

CScene3D.cs

using System;
using System.Windows;
using System.Windows.Controls;
using System.Windows.Media;
using System.Windows.Media.Media3D;
using System.Windows.Media.Animation;

namespace ConsoleApplication {
    class CScene3D {
        // Animation - Tetrahedron (upright, looking slightly up from below)
        public static Viewport3D Test() {

            // Define the camera
            PerspectiveCamera myPCamera = new PerspectiveCamera();
            myPCamera.Position = new Point3D(0, .2, 3);

            // Define a lighting model
            DirectionalLight myDirectionalLight = new DirectionalLight();

            // Define the geometry
            const double kdSqrt2 = 1.4142135623730950488016887242097;
            const double kdSqrt6 = 2.4494897427831780981972840747059;
            // Create a collection of vertex positions
            Point3DCollection myPositionCollection = new Point3DCollection();
            myPositionCollection.Add(new Point3D(0.0, 1.0, 0.0));
            myPositionCollection.Add(new Point3D(2.0 * kdSqrt2 / 3.0, -1.0 / 3.0, 0.0));
            myPositionCollection.Add(new Point3D(-kdSqrt2 / 3.0, -1.0 / 3.0, kdSqrt6 / 3.0));
            myPositionCollection.Add(new Point3D(-kdSqrt2 / 3.0, -1.0 / 3.0, -kdSqrt6 / 3.0));
            // Create a collection of triangle indices
            Int32Collection myTriangleIndicesCollection = new Int32Collection();
            // Triangle
            myTriangleIndicesCollection.Add(0);
            myTriangleIndicesCollection.Add(2);
            myTriangleIndicesCollection.Add(1);
            // Triangle
            myTriangleIndicesCollection.Add(0);
            myTriangleIndicesCollection.Add(1);
            myTriangleIndicesCollection.Add(3);
            // Triangle
            myTriangleIndicesCollection.Add(0);
            myTriangleIndicesCollection.Add(3);
            myTriangleIndicesCollection.Add(2);
            // Triangle
            myTriangleIndicesCollection.Add(1);
            myTriangleIndicesCollection.Add(2);
            myTriangleIndicesCollection.Add(3);
            MeshGeometry3D myMeshGeometry3D = new MeshGeometry3D();
            myMeshGeometry3D.Positions = myPositionCollection;
            myMeshGeometry3D.TriangleIndices = myTriangleIndicesCollection;
            // Apply the mesh to the geometry model.
            GeometryModel3D myGeometryModel = new GeometryModel3D();
            myGeometryModel.Geometry = myMeshGeometry3D;

            // Define the material for the geometry
            SolidColorBrush qColorBrush = new SolidColorBrush(Color.FromArgb(255, 0, 255, 0));
            DiffuseMaterial myMaterial = new DiffuseMaterial(qColorBrush);
            myGeometryModel.Material = myMaterial;

            // Define the transformation, if any. In this case, we use an animated transformation
            RotateTransform3D myRotateTransform = 
                new RotateTransform3D(new AxisAngleRotation3D(new Vector3D(0, 1, 0), 1));
            DoubleAnimation myAnimation = new DoubleAnimation();
            myAnimation.From = 1;
            myAnimation.To = 361;
            myAnimation.Duration = new Duration(TimeSpan.FromMilliseconds(5000));
            myAnimation.RepeatBehavior = RepeatBehavior.Forever;
            myRotateTransform.Rotation.BeginAnimation(AxisAngleRotation3D.AngleProperty, myAnimation);
            myGeometryModel.Transform = myRotateTransform;

            // Collect the components
            Model3DGroup myModel3DGroup = new Model3DGroup();
            myModel3DGroup.Children.Add(myDirectionalLight);
            myModel3DGroup.Children.Add(myGeometryModel);
            ModelVisual3D myModelVisual3D = new ModelVisual3D();
            myModelVisual3D.Content = myModel3DGroup;
            Viewport3D myViewport3D = new Viewport3D();
            myViewport3D.Children.Add(myModelVisual3D);
            myViewport3D.Camera = myPCamera;

            return myViewport3D;
        }
    }
}

Creating a Simple Javascript Animation Using Recursion

The animation that we create in this example is a simple progress bar. Above, you can see a light gray rectangle with a darker gray rectangle inside it. The darker gray bar is the progress bar that moves from left to right across the screen.

The code for this animation is below. You can copy code into an empty file with a .html extension or just download the HTML file using this link. Just right-click that link and left-click “Save Link As…” and select a location to save it to. Then double-click the file to open it with a browser.

As you can see in the code below, we define two styles: animbkgd and animbar. These are used to create div elements for the background and the progress bar, respectively. The div elements are created inside the body tag near the bottom of the file.

At the bottom of the head section, we have script tags to define the Javascript code section. We begin by defining three variables: qpBkdg, qpBar, and iWidth. The first two are used to refer to background and progress bar div sections and are set inside the Initialize() function. The third variable keeps track of the width of the progress bar.

The animation is started after the page is loaded with code

window.onload = Initialize;

that sets the Initialize() function to be the callback function for when the page loads.

When Initialize() is called, is initializes the two variables and then calls the animation loop function Loop(). The Loop() function updates the width variables and then sets itself to be called again in 20 milliseconds. That is the effect of the call

setTimeout(Loop,20);

The setTimeout() function calls a function after a specified period of time. Here, it is set to call Loop() after 20 milliseconds. So, the code creates a recursive loop where Loop() is called every 20 milliseconds to create the animation.


<!DOCTYPE html PUBLIC "-//W3C//DTD XHTML 1.0 Transitional//EN"
"http://www.w3.org/TR/xhtml1/DTD/xhtml1-transitional.dtd">

<html xmlns="http://www.w3.org/1999/xhtml" xml:lang="en" lang="en">

<head>
<title>XoaX.net's Javascript Recusive Animation Example</title>

<style type="text/css">
#animbkgd {
    position:absolute;
    width: 480px;
    height: 50px;
    background:#aaaaaa;
    margin: 30px;
}

#animbar {
    position:absolute;
    width: 0px;
    height: 20px;
    background:#000000;
    left: 0px;
    top: 20px;
}
</style>

<script type="text/javascript">
/*<![CDATA[*/
var qpBkdg = null;
var qpBar = null;
var iWidth = 0;

function Loop() {
    qpBar.style.width = iWidth+'px';
    iWidth = ((iWidth + 1) % 480);
    setTimeout(Loop,20);
}

function Initialize() {
    qpBkdg = document.getElementById('animbkgd');
    qpBar = document.getElementById('animbar');
    Loop();
}

window.onload = Initialize;
/*]]>*/
</script>
</head>

<body>

<div id="animbkgd">
    <div id="animbar">
    </div>
</div>

</body>
</html>


© 2007–2024 XoaX.net LLC. All rights reserved.