Bits & Bytes

Posts Tagged ‘diagrams’

UML Class Diagrams – part 5

Continued . . .

For this section, we pull together the material for modeling operations and attributes to give a specification of the full form and then discuss modeling for the appropriate level of detail. For attributes and operations, the name is always used, but the rest of the elements are optional. By convention, the class name is in the top box, followed by attributes and operations, respectively. This is the common convention that we have used and it is highly recommended, but UML does allow for any ordering.

For attributes, we have full form shown below. The name is mandatory, and the rest of the optional elements are shown in C++ template-style brackets ( < > ) to indicate that they are optional. First, we have the visibility, which is shown as +, #, , or ~ for public, protected, private, or package level visibility, respectively. Then we have the name. The attribute could contain multiple instances of its type; the allowed range of multiplicity can be specified in bracket notation like this [0..1], [n], or [0..*], which correspond to {0, 1}, {n}, or {0, 1, 2, … } in set notation, respectively. After this, we have a colon followed by the type. Then an “=” and an initial value. Finally, we have a the properties list, each of which may have a value setting.

Attributes

<visibility> name <Multiplicity> <: Type> <= InitialValue> <{Properties}> 
Properties
Property1 <= Value1>, ... 

For operations, the full form is shown below. Again, the optional elements are show in C++ template-style brackets. Just as with attributes, we have the visibility followed by the name. Inside the parentheses, we have the arguments, which can have a direction, name, type, and default value, as shown under the Arguments heading. After the arguments, we have a colon and the return type. Finally, we have the properties in braces, just as with the attributes.

Operations

<Visibility> Name(Arguments) <: ReturnType> <{Properties}>
Arguments
<Direction1> <ArgName1> <: ArgType1> <= DefaultValue1> ; ...
Properties
Property1 <= Value1> , ...

Below, we have a class for creating cubic polynomials. These are polynomials of the form

F(x) = c0x0 + c1x1 + c2x2 + c3x3

= c0 + c1x + c2x2 + c3x3,

where ci is a constant coefficient of the appropriate degree. The function F() is used to evaluate the polynomial at a particular value of x. For this class, we will assume that a constructor exists (not shown) that initializes the cubic to be the zero polynomial (all zero coefficients).

class CCubic
{
public:
    double F(double dX = 0.0) const;
private:
    double mdaC[4];
};

This class can be diagramed in UML, as shown below, with in the fullest form for attributes and operations. Here, we use the assumption that the cubic is initialized in a constructor somewhere to be the zero polynomial; of course, that make the polynomial a constant and not a cubic. The coefficients can be changed, so we indicate that with the “changeable” property. Also, the function F() is “const” because does not change the values of the coefficients. Moreover, it is statically bound. Therefore, we have modeled it with the property specifications “isQuery” and “leaf” to indicate these properties.

This an elaborate specification, but is reasonable for modeling a simple class like this. However, for a diagram with many attributes and operations, this level of detail can get messy and difficult to read. Moveover, many of the details may not be relevant in a given context. For example, when designing this class it is probably not very important what the initial values of the coefficients are or the default value of dX in the function F(). So, we might use the cleaner version below.

Likewise, the fact that the coefficients are “changeable” is probably obvious as are the properties of the function F(). Furthermore, the use of doubles is probably clear and may not even be material to the design. So, we can throw those out as well as the obvious fact that dX is an input parameter. Our greatly simplified diagram now looks like this.

Finally, in a larger context, we may only be concerned that a cubic class exists and we can throw out the attributes and operations entirely, as we demostrate below. Notice that our diagram has three compartments, even though two ar empty. In this case, we could use simply one compartment with the class name or we could use three like this to indicate that it is important to keep in mind that this class has attributes and operations.

UML Class Diagrams – part 3

Continued . . .

So far, we have modeled our classes with considerable detail, but there is still more that we can show. C++ provides several levels of visibility for variables and operations. The three primary visibility designations are public, protected, and private. Additionally, variables can have package level visibility, which means that they can only be accessed within the file in which they are defined. Package visibility is seldom used in C++, but is common in C.

The first three visibility settings are commonly used in most object-oriented languages. The public setting means that the member function or variable can be accessed by anything that can access the main object. The protected setting means that the member can only be accessed by functions from the class that the member is declared in and all functions of classes that inherit the class. Finally, private visibility means that the member can only be accessed by functions within the class where the member is declared.

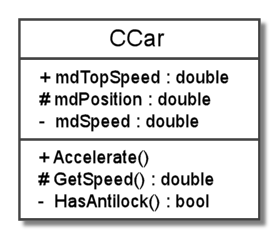
The C++ class below shows the header for a car class, called CCar. This class has three member functions and three member variables, each with a different visibilty setting. In C++, members of a class have private visibility by default. Otherwise, they have the visibility of the last specification that is above them in the class. So, for example, mdPosition has protected visibility. For clarity, we have listed the visibility specifiers for the class in the order of decreasing visibility, from public to private.

class CCar
{
public:
    void Accelerate();
    double mdTopSpeed;
protected:
    double GetSpeed();
    double mdPosition;
private:
    bool HasAntilock();
    double mdSpeed;
};

This car class can be modeled by the UML class diagram shown below. The visibility of a member is specified by a symbol that precedes the variable or function name. We use +, #, and for public, protected, and private, respectively. So, we see that in the UML diagram, we have one variable and function with each type of visibilty.

Finally, we remark that we can have variables with package visibility. This is designated by a ~ symbol. Package visibility is more common in other programming languages like Java, but has been passed down to C++ from C. To declare a package level variable, we declare the variable in global scope and precede the declaration by the word static, like this

static int i;

Of course, these visibility specifiers are not strictly meaningful in C++. In C++, we can break the encapsulation of a visibility specifier via the friend specification, but that is uncommon and can be modeled by other means.

To be continued . . .

UML Class Diagrams – part 1

UML stands for the Unified Modeling Language and it is a system for communicating the design and development of a software system. Object-oriented programming (OOP) has developed as the major tool to manage program complexity, and UML is the primary method of diagramming object-oriented programming structures and interactions. UML diagrams are used to create designs, communicate between developers, and document code so that it can be understood quickly. The most common type of UML diagram is a class diagram, which is sometimes called a static diagram.

A class diagram models classes and the relationships between them. The central element of class diagrams is a rectangular box that is used to represent a class. Typically, the box is separated into three sections that hold the class name, attributes, and operations. Attributes and operations are generic object-oriented design (OOD) terms for variables and functions. The layout of these items is shown here:

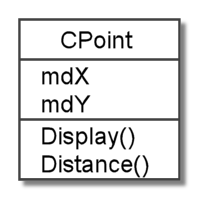
A simple example class should help to make these abstractions concrete. The point class header shown below has two attributes that given by the x and y double variables that represent the coordinates of the point in the plane. The class also has two operations: one to display the point and one to find the distance to another point. The point class has four members in all, all of which are public.

class CPoint
{
public:
    double mdX;
    double mdY;

    void Display();
    double Distance(CPoint qP);
};

With a basic illustration, this class can be represent by the simple UML diagram below. Notice that the member variables are in the attributes section and the member functions are in the operations section. That’s pretty straightforward, so far. However, this is just a simple diagram, and there are many other elements that we could have shown in it.

Eventually, we will explain how to diagram this class completely and much more, but it is important to remember that diagrams do not need to display all of the details of the code. UML diagrams are for communication and understanding; they should be used to emphasize the elements that are important to the context. As we will demonstrate in our upcoming examples, extraneous details will often be omitted to highlight important points.

To be continued . . .


© 2007–2024 XoaX.net LLC. All rights reserved.